
Halo Campaign Evolved Skull locations are spread across all 13 missions, with three hidden Skulls in each level. Some sit near the main route, while others require platforming, optional combat rooms, or specific actions before they appear.
Finding all 39 hidden Skulls unlocks the Headhunter achievement or trophy. Collecting any three also unlocks Campaign Remix and automatically adds the Adaptation, Armistice, and Reload modifiers to your collection. hear a faint ambient sound while standing near a Skull. Follow that noise and use the Interact button to collect it.
All Halo Campaign Evolved Skulls
Click a link below to jump to a specific mission guide.
| Mission | Skulls |
|---|---|
| The Pillar of Autumn | Speed Limit, Magnified, Perspective |
| Halo | Give & Take, Floor is Lava, Grunt Funeral |
| The Truth and Reconciliation | Iron, Endurance Spec, Foreign |
| The Silent Cartographer | Bandana, Acrophobia, Hip Fire |
| Assault on the Control Room | IWHBYD, Angry, Cowbell |
| 343 Guilty Spark | Fog, That’s Just… Wrong, They Come Back |
| The Library | Tilt, Pop, Famine |
| Two Betrayals | Tough Luck, Black Eye, Mythic |
| Keyes | Catch, Blind, Pinata |
| The Maw | Stowed Reload, Boom, Thunderstorm |
| Boarding Action | Malfunction, Johnny Ammo Seed, Leadhead |
| The Most Dangerous Game | Temperamental, Recession, Ghost |
| Heavy Burden | Eye Patch, Grunt Birthday Party, Efficient |
The Pillar of Autumn Skull Locations
The Pillar of Autumn contains the Speed Limit, Magnified, and Perspective Skulls. All three appear during the opening portion of the campaign and can be collected before leaving the ship.
Speed Limit Skull Location
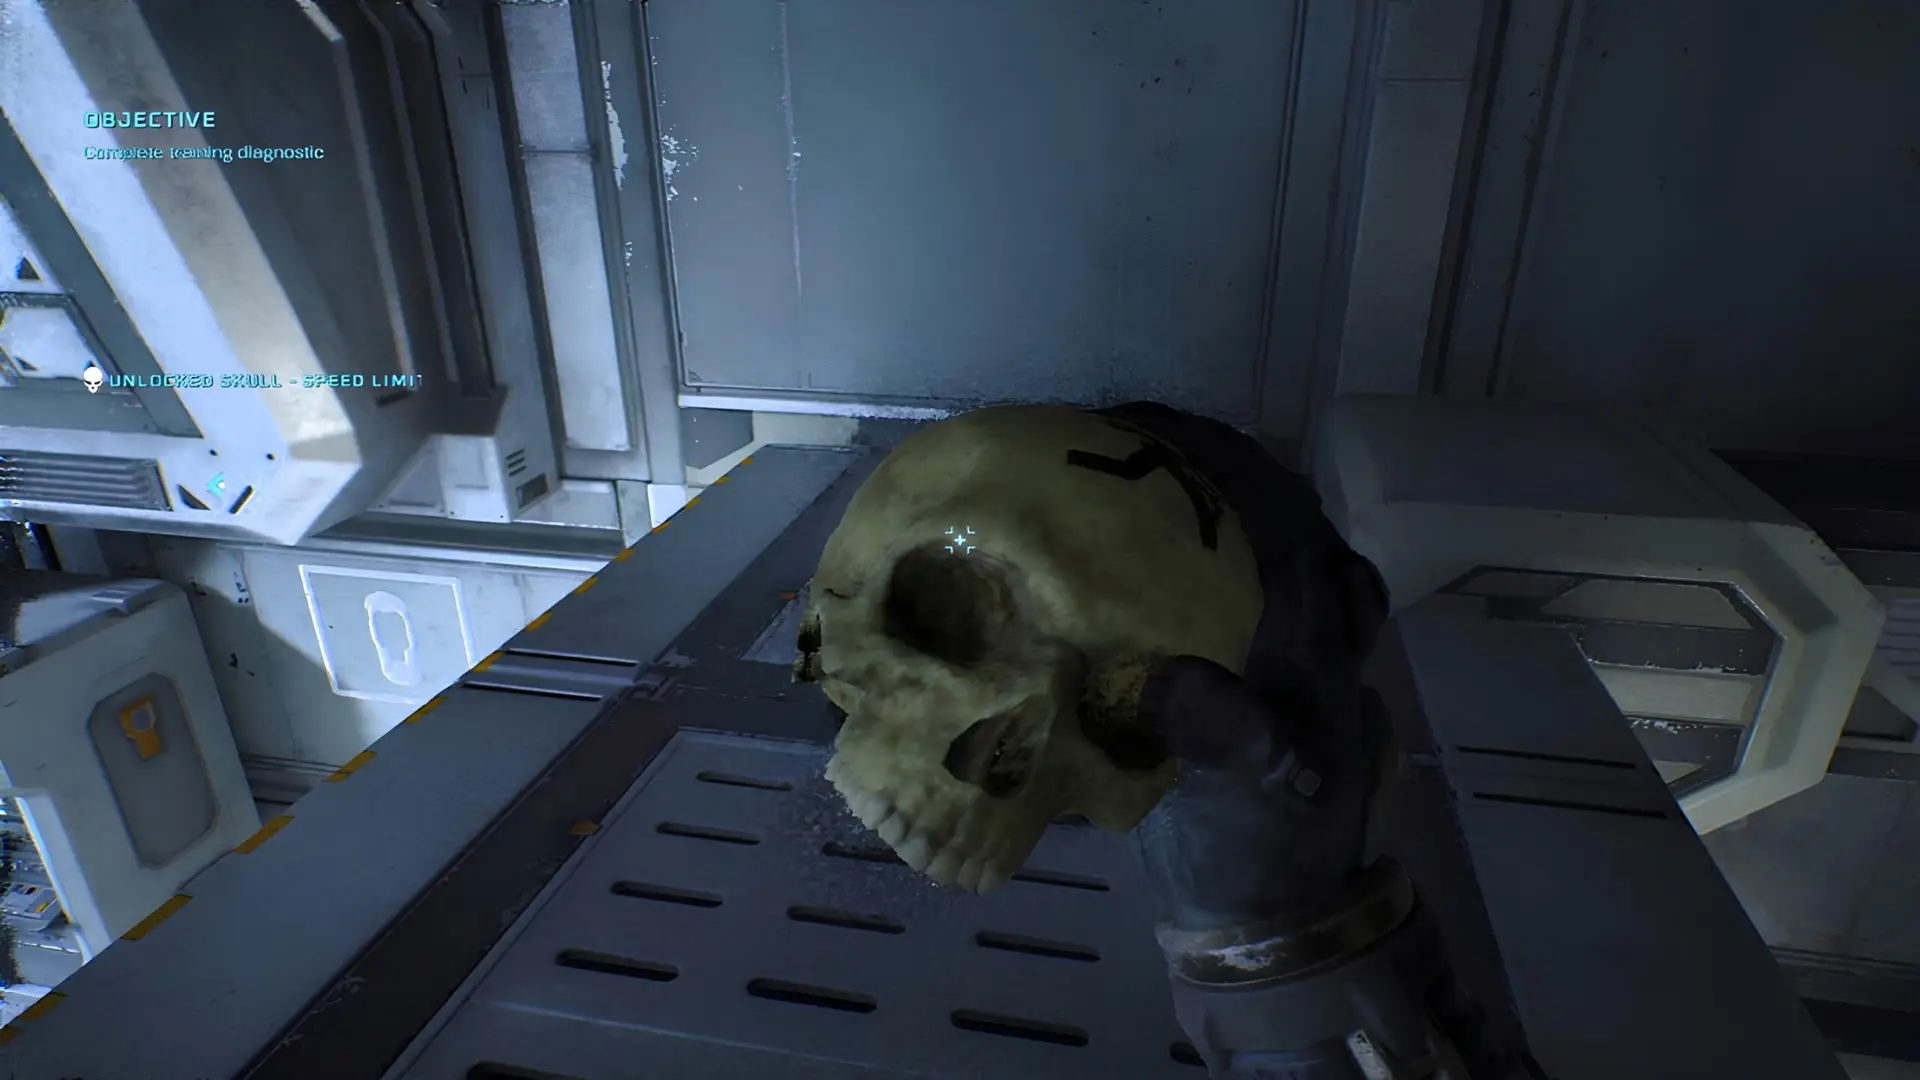
The Speed Limit Skull is in the cryo chamber where the mission begins.
Before leaving the starting room, walk to the back-left corner and find two barrels sitting next to each other. Take a running jump onto them, then jump again to reach the upper catwalk walkway.
Follow the catwalk to its opposite end. The Skull is sitting on the upper platform.
Speed Limit disables sprint.
Magnified Skull Location
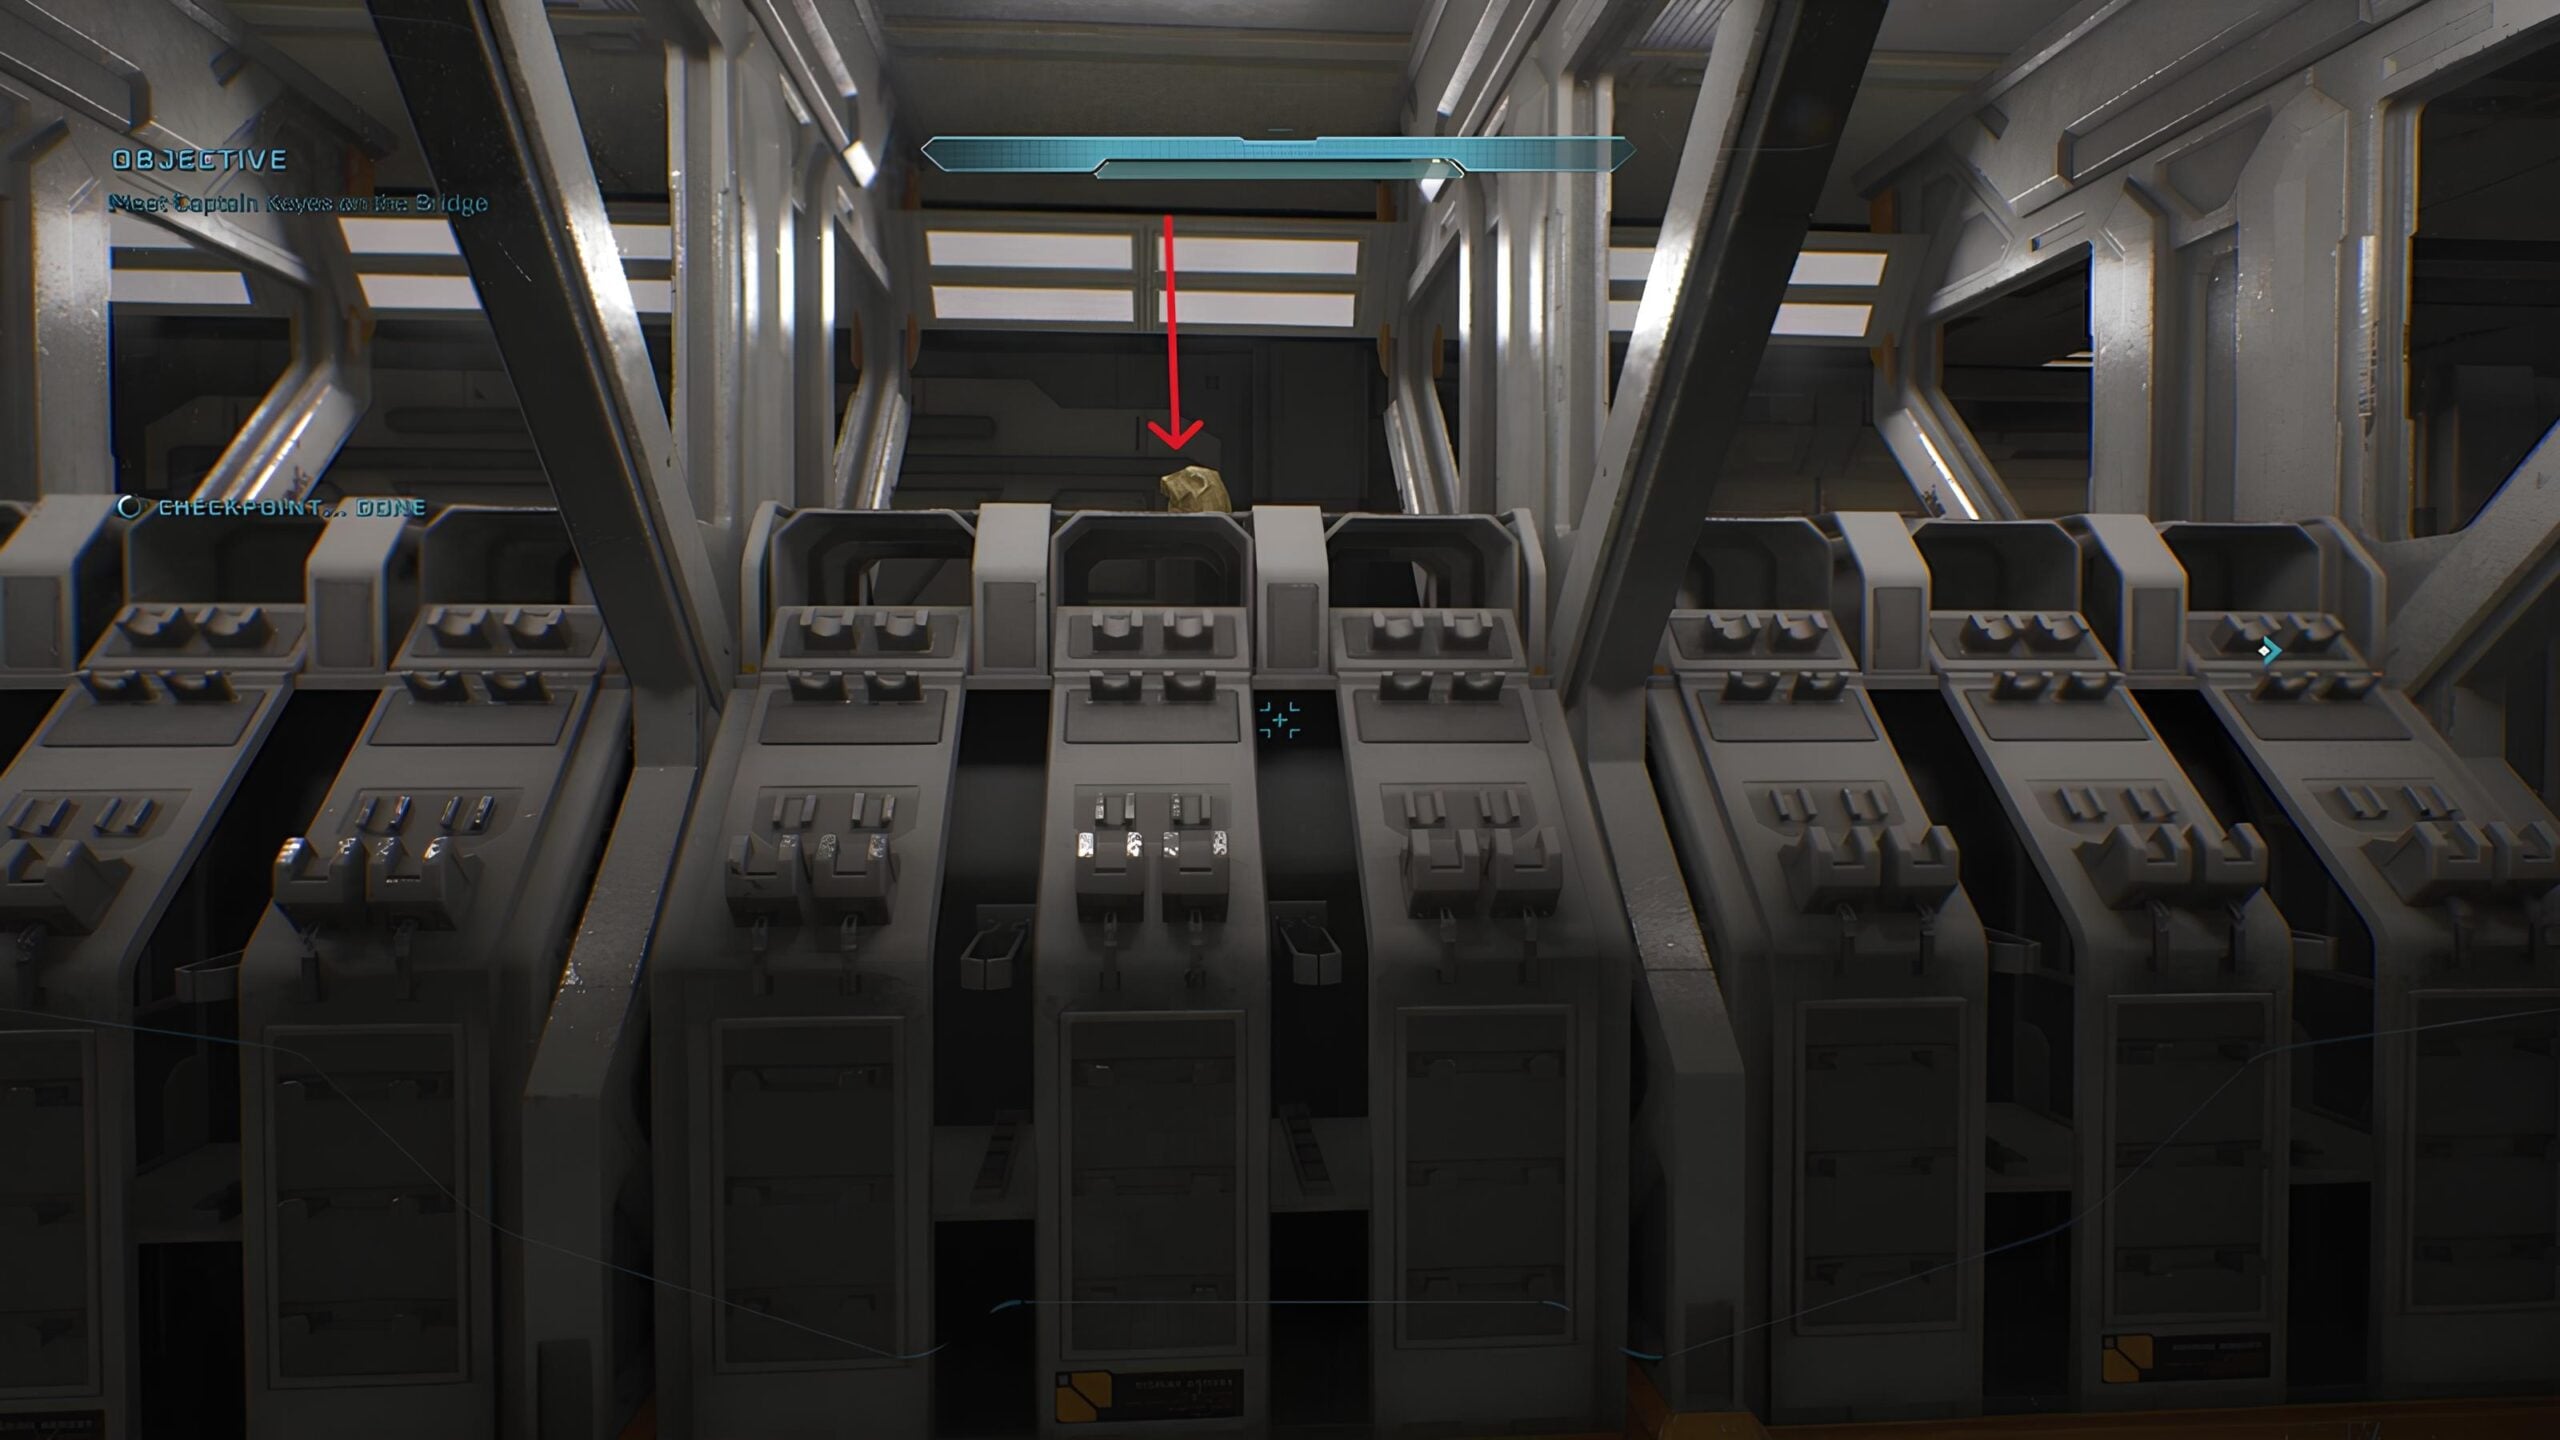
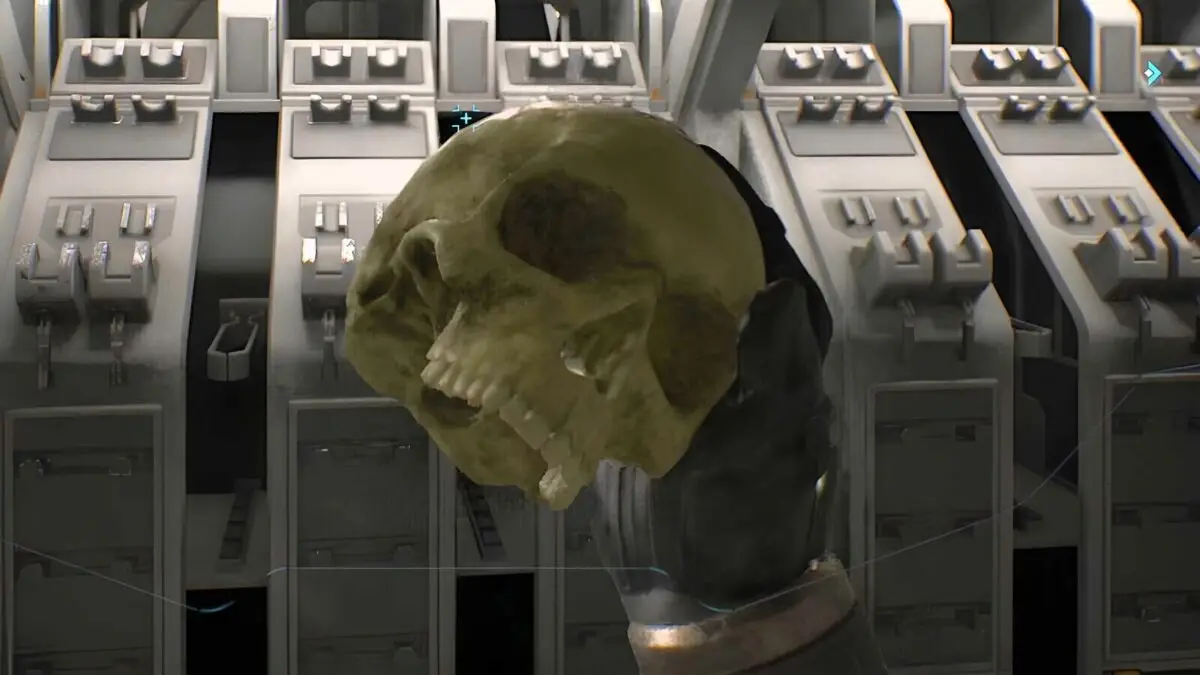
Continue through the tutorial route toward the bridge. Before receiving a weapon, you will pass through a weapons locker room with several rows of connected lockers or equipment units. This is when Dubbo tells you to follow him.
Climb onto the first central row. The Magnified Skull is resting on top of it about halfway across the room.
Magnified increases the Assault Rifle magazine capacity to 60 rounds.
Perspective Skull Location
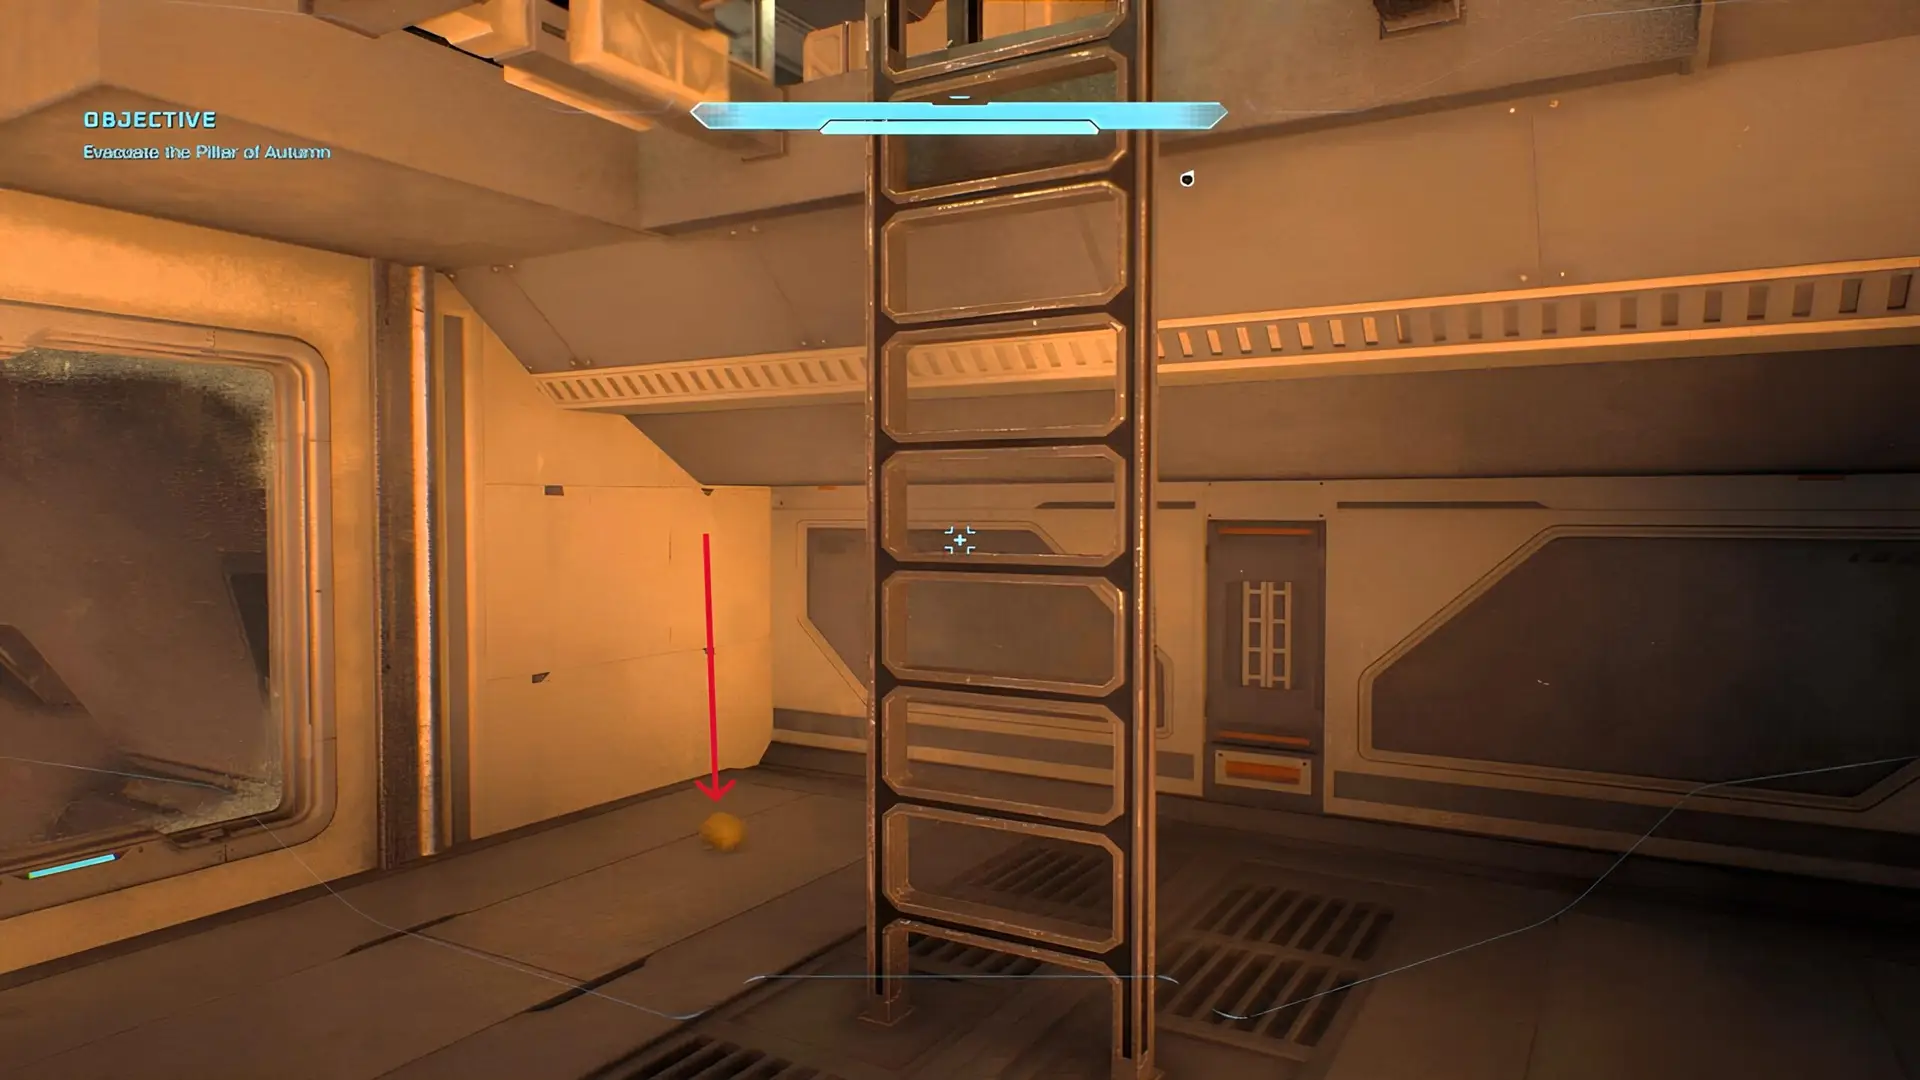
Meet Captain Keyes on the bridge and wait until the conversation finishes. After receiving the Magnum and regaining control, turn around instead of following the objective out of the room.
Walk toward the two pilot seats at the front of the bridge. Drop into the recessed area beneath the seats and check near the ladder to find the Perspective Skull.
This is the same location where you need to trap six marines to get the This is My Ship Now Achivement.
Perspective changes the campaign camera to third-person.
Halo Skull Locations
The Halo mission contains the Give & Take, Floor is Lava, and Grunt Funeral Skulls. Two are hidden around the lifeboat rescue areas, while Grunt Funeral requires more careful platforming.
IMPORTANT NOTE: Make sure to get all three Skulls before completing the last life boat rescue as this will automatically end the level.
Give & Take Skull Location
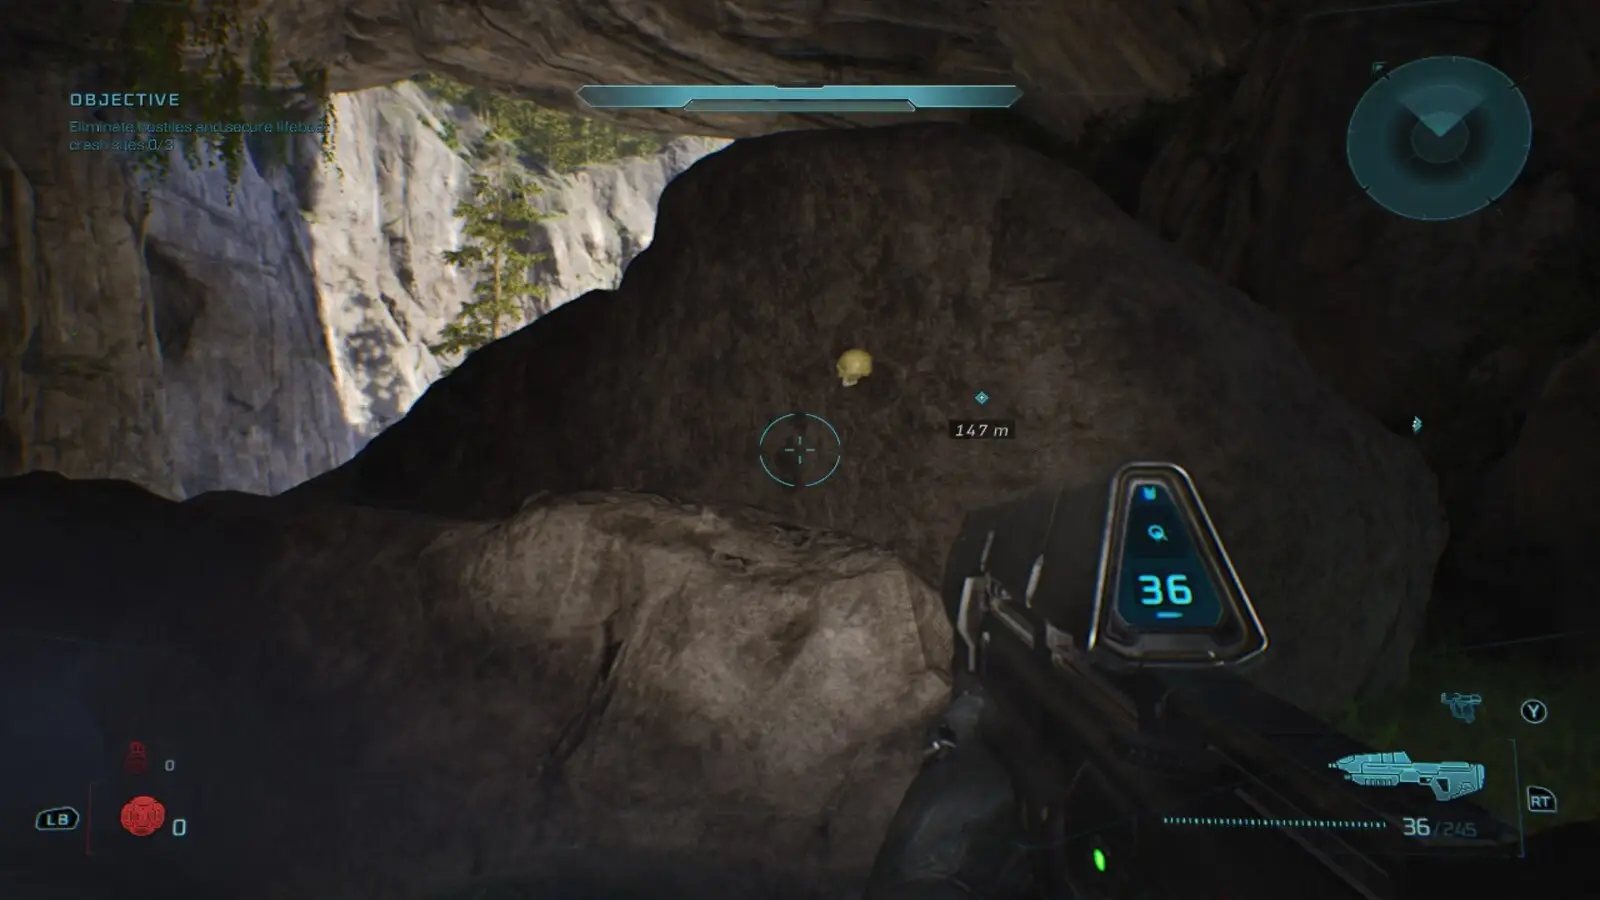
Reach the open section where you must rescue Marines at three different lifeboat crash sites. In the central area connecting those locations, find the river and follow it away from the main battlefield.
The water leads into a cave. Continue inside until you reach several large rocks beside the river. The Give & Take Skull is sitting on one of the rocks near the water.
Give & Take drains your shields when you fire a weapon. Damaging enemies restores them.
Floor is Lava Skull Location
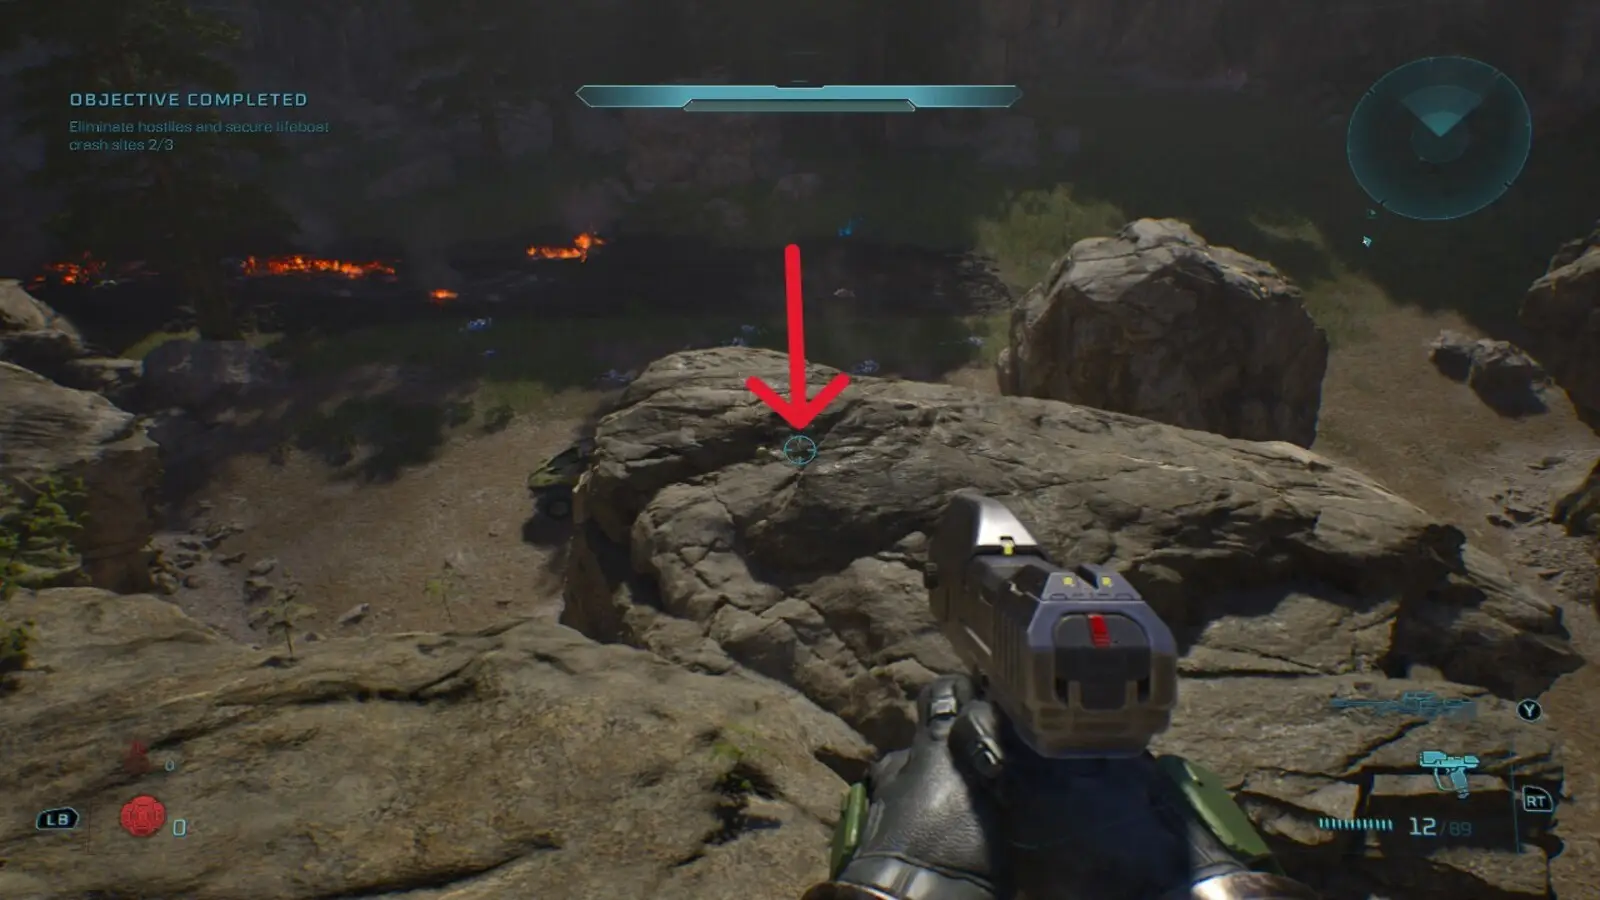
Travel to the lifeboat site surrounded by a large raised rock formation. Climb or drive onto the grassy hill overlooking the crashed pod.
Face the lifeboat and look below the hill for a smaller outcrop. Drop onto that lower rock to find the Floor is Lava Skull.
Floor is Lava continuously damages you while you are touching the ground.
Grunt Funeral Skull Location
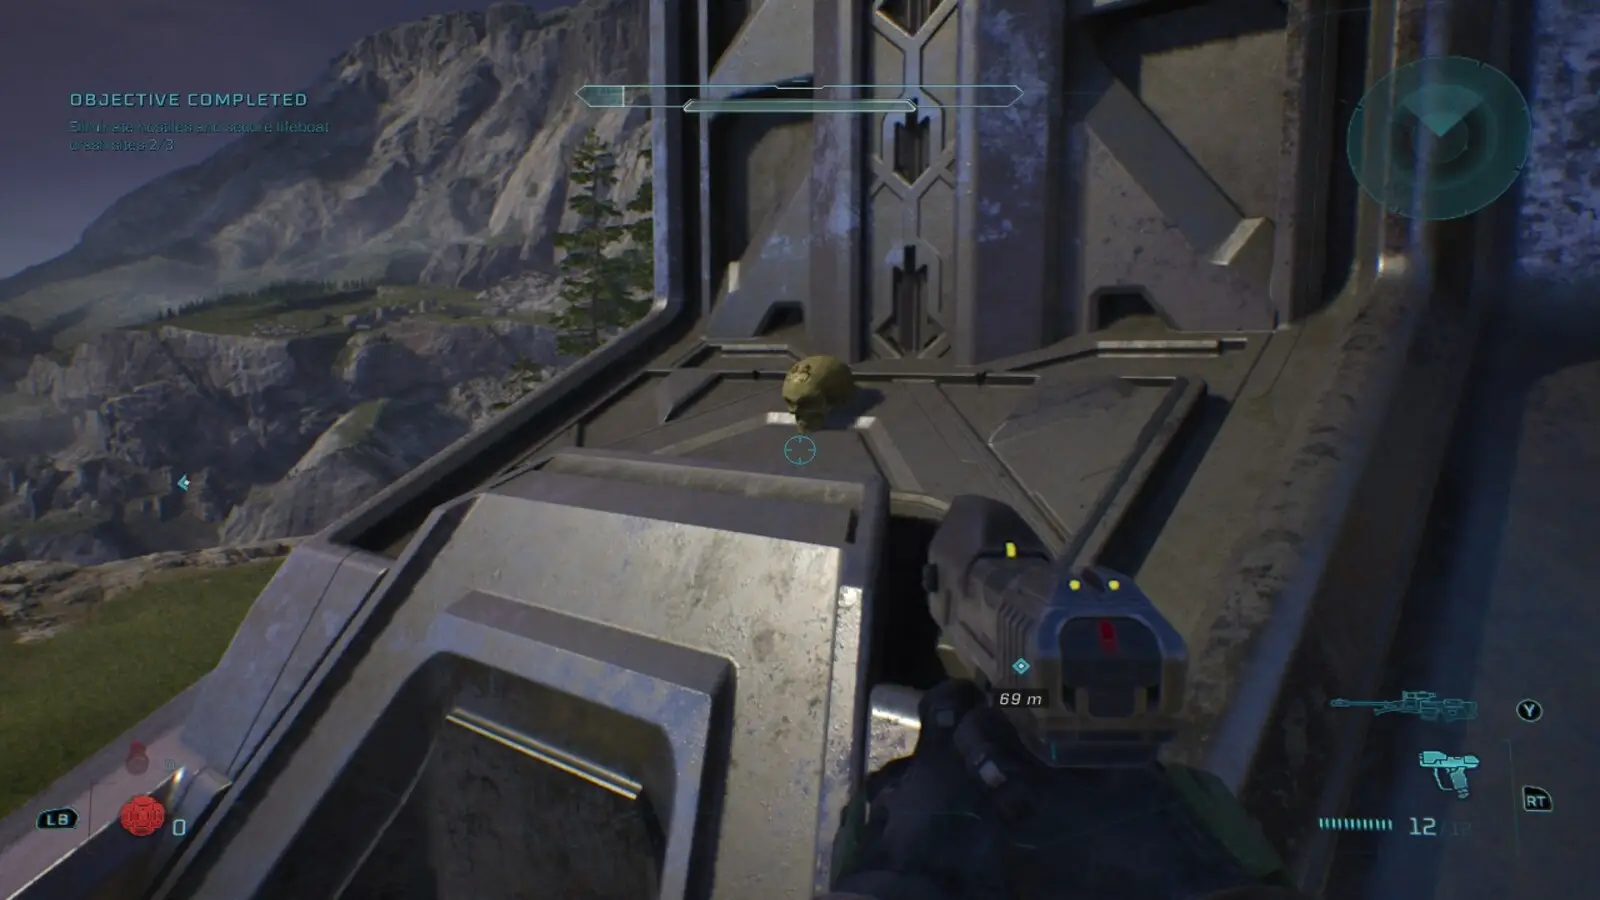
At the lifeboat area with an underground section near the cliff, locate the large metallic spire in the center of the area. There are two spires so make so you are at the one where you go underneath them to find the troops.
Climb the thin diagonal ridge beside the blue light until you reach a small platform halfway up the structure. Turn around to spot the Skull on a higher ledge across the gap. Stand on the narrow ledge below the Skull platform and drop a grenade onto the surface beneath you. Move to the edge, then jump toward the Skull just before the grenade explodes. The blast should launch Master Chief high enough to reach the upper ledge.
A Plasma Grenade works well because it stays where it lands, which makes the timing more predictable. Start with full shields and avoid standing directly over the explosion.
Restarting the checkpoint may be faster than searching for more grenades after several failed attempts.
Grunt Funeral causes dead Grunts to explode in a burst of plasma.
The Truth and Reconciliation Skull Locations
The Truth and Reconciliation contains the Iron, Endurance Spec, and Foreign Skulls. Search both the canyon beneath the Covenant ship and the interior combat rooms before progressing too far.
Iron Skull Location
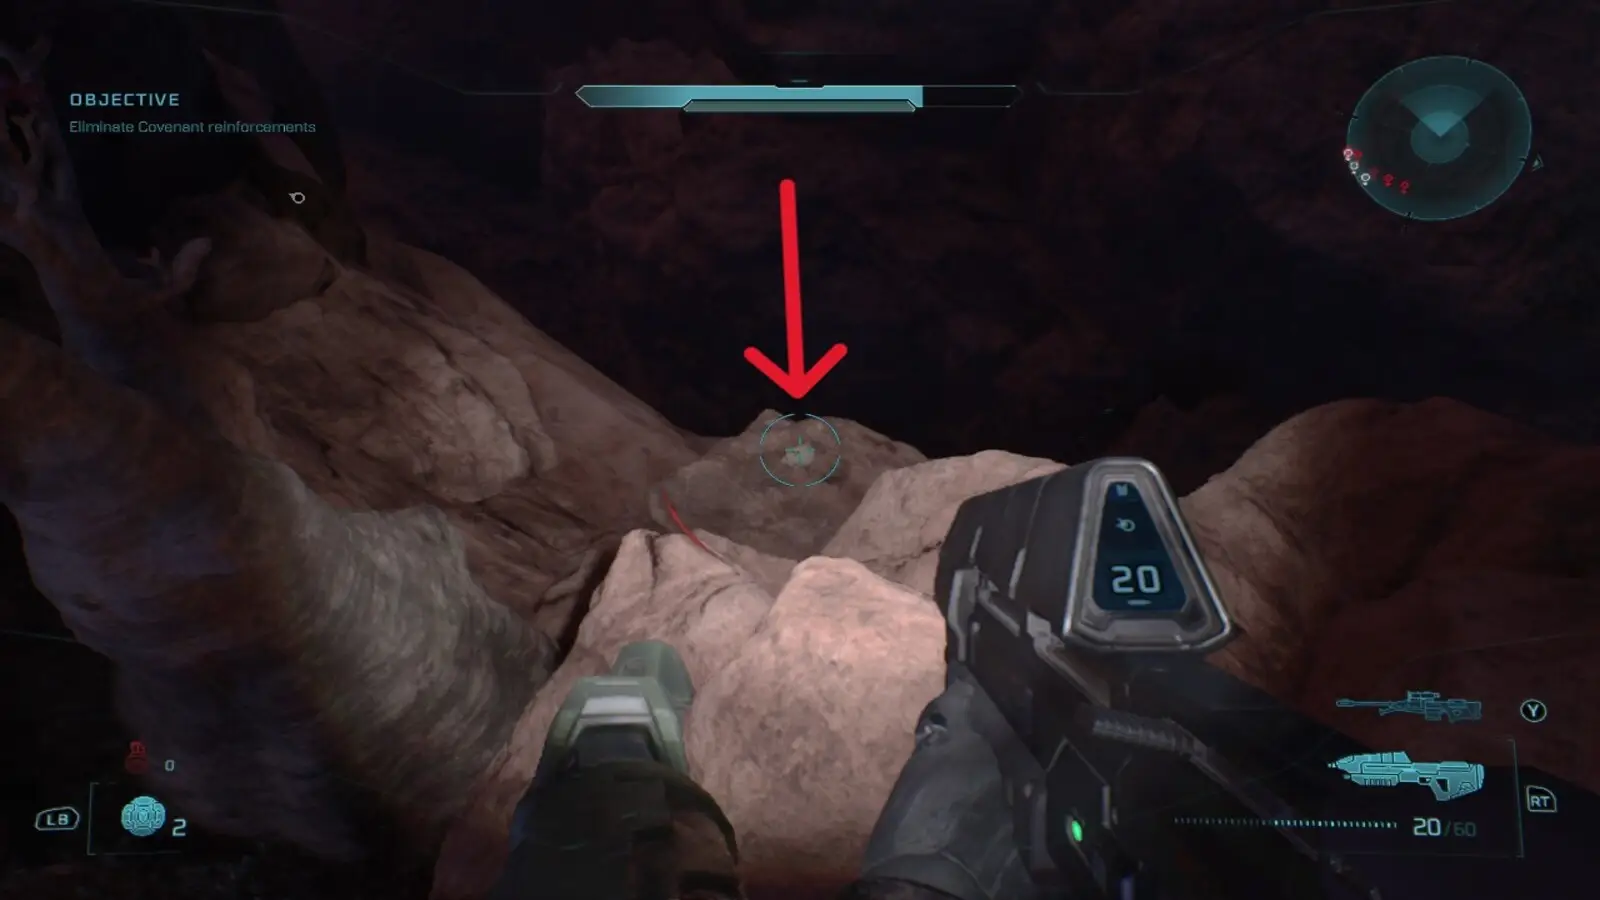
Fight through the opening canyon until you reach the area containing the gravity lift into the Covenant ship.
Before entering the lift, walk to the other side of the lift. Look for a small white light close to the edge, then carefully look over the side. The Iron Skull rests on a narrow ledge below.
Drop directly onto the ledge rather than walking off at an angle.
Do not jump from the cliff afterward. To return to the battlefield, face the nearby tree and jump into the space between its trunk and the rock wall. Keep moving forward while repeatedly jumping, crouching, and shifting slightly from side to side. Master Chief should eventually catch the upper edge and climb back onto solid ground.
Iron restarts the entire mission after death in solo play. In co-op, a player death sends the group back to the previous checkpoint.
Endurance Spec Skull Location
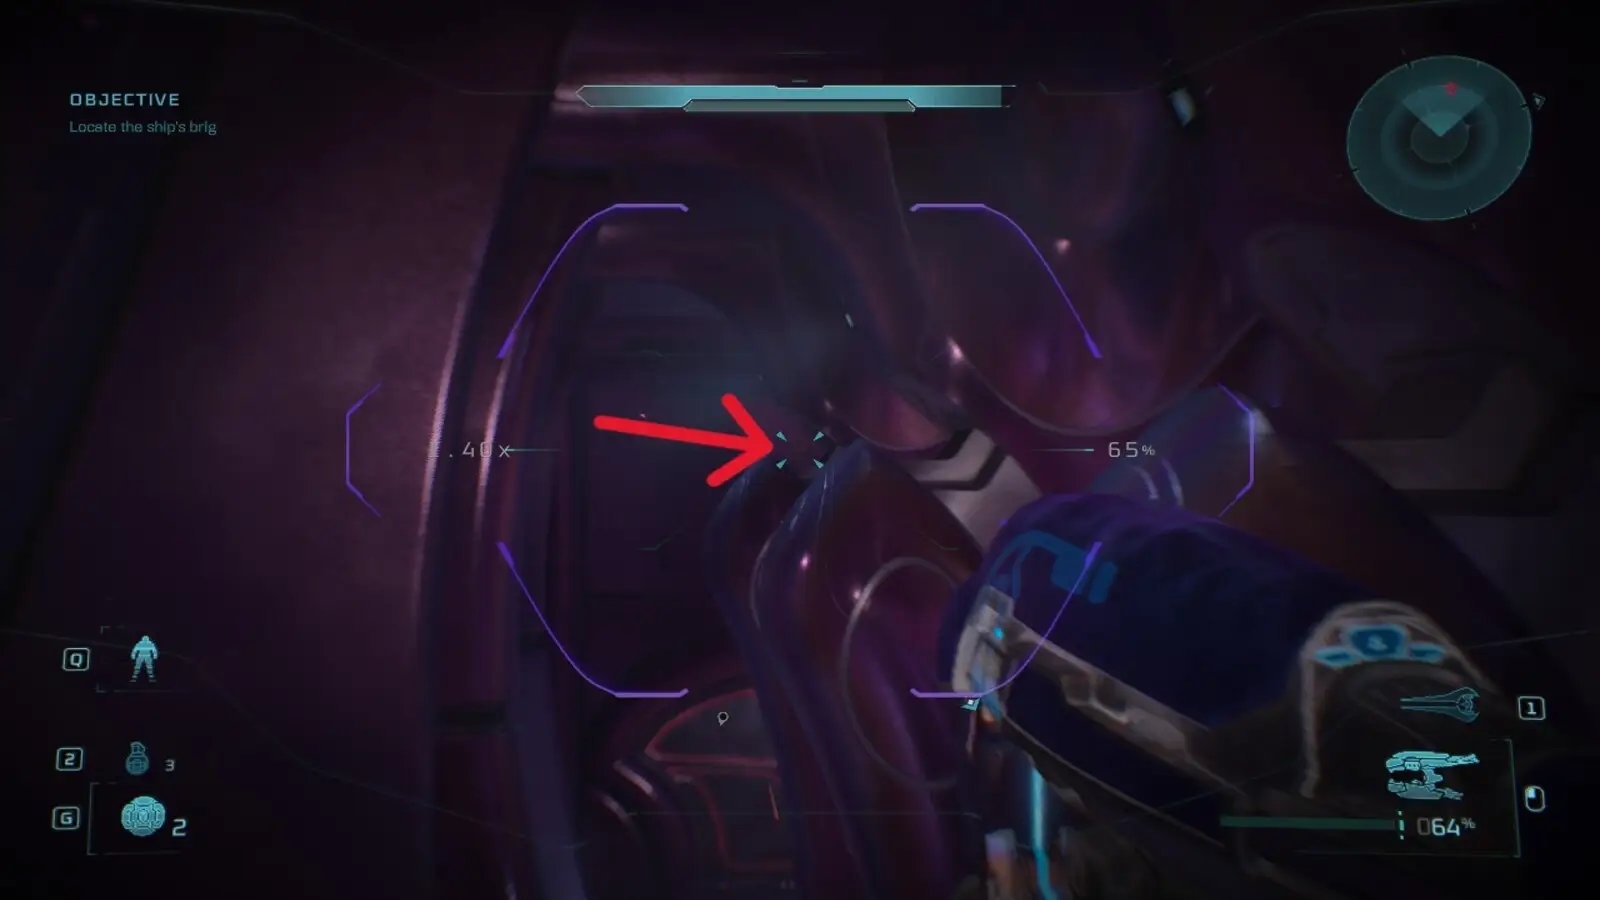
After boarding the ship, continue until you enter a large room with two Wraiths on the lower floor. You will initially move through this area along an upper walkway.
Go to the far corner of the walkway and locate a purple Covenant crate. Jump onto it, then use it to reach the nearby vertical pillars. Move across the tops until you reach the third pillar, where the Endurance Spec Skull is waiting.
Falling does not necessarily ruin the attempt. A doorway in the back corner provides a route to the upper level.
I found the best strategy is to jump from the purple crate onto the first slanted pillar. Once you land, stop moving and wait for the game to create a checkpoint.
After the checkpoint appears, line up the jump to the second pillar and aim for its wider middle section. If you miss, reload the checkpoint instead of repeating the crate jump. From the second pillar, continue to the third to collect the Endurance Spec Skull.
Endurance Spec makes UNSC vehicles immune to damage.
Foreign Skull Location
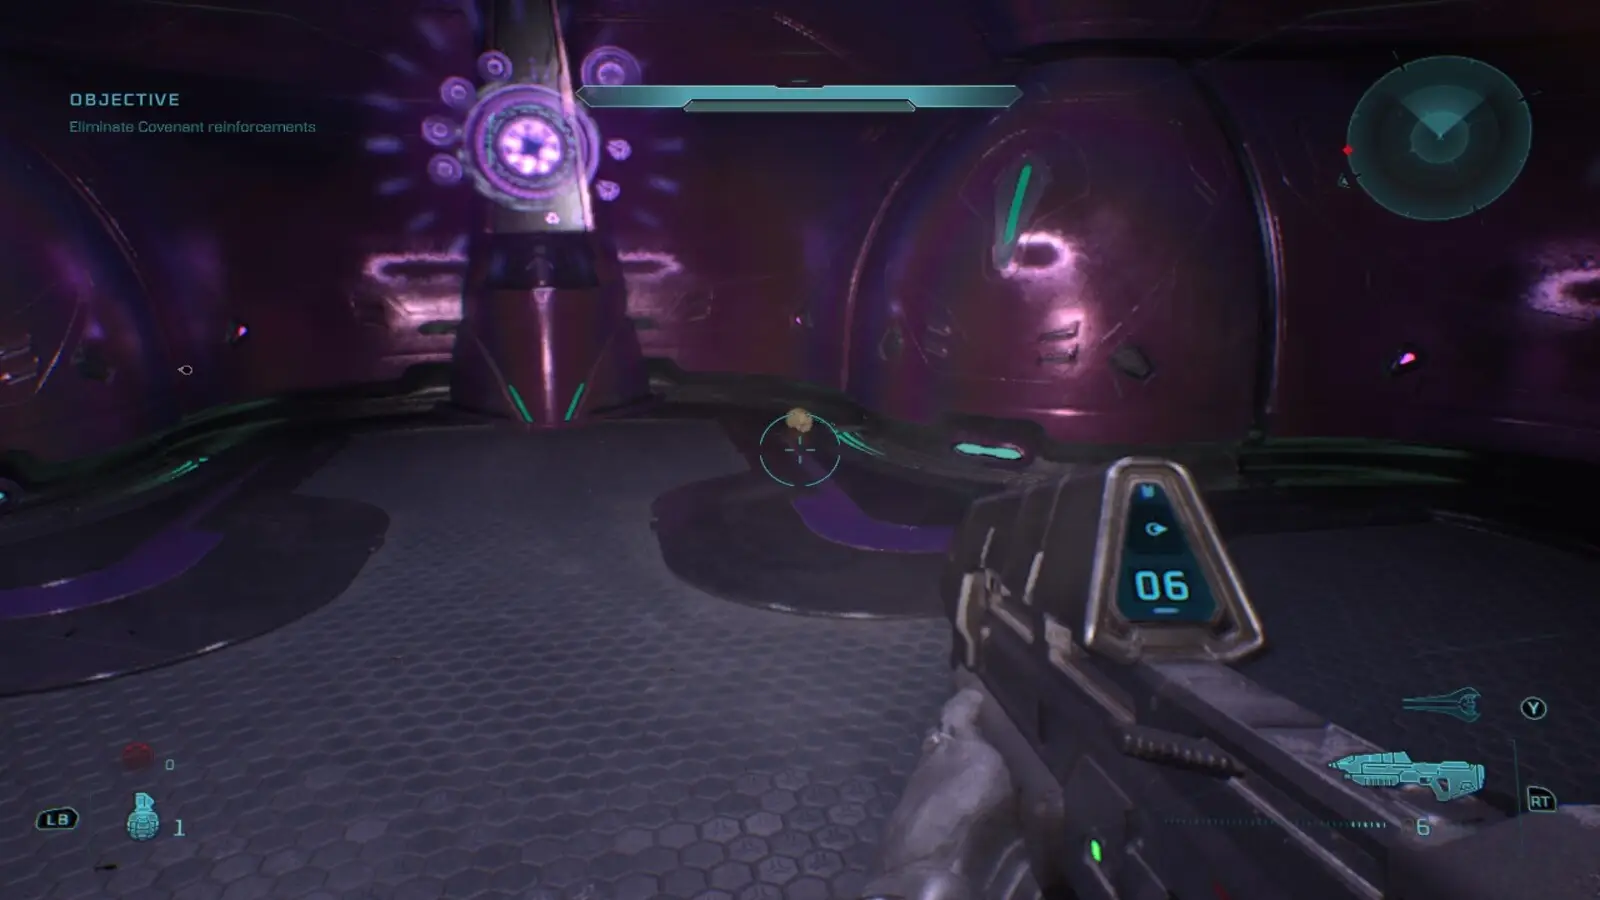
Later, you will enter the large hangar on the first level of the Covenant ship. Move to the back-right corner and locate a locked door.
Do not leave the area after clearing the first enemies. More Covenant eventually emerges through that door. Enter before it closes and follow the path until you see the Foreign Skull sitting on the floor.
Foreign prevents you from using weapons belonging to another faction.
The Silent Cartographer Skull Locations
The Silent Cartographer contains the Bandana, Acrophobia, and Hip Fire Skulls. These collectibles are spread between the island’s exterior facilities and its deeper underground chambers.
Bandana Skull Location
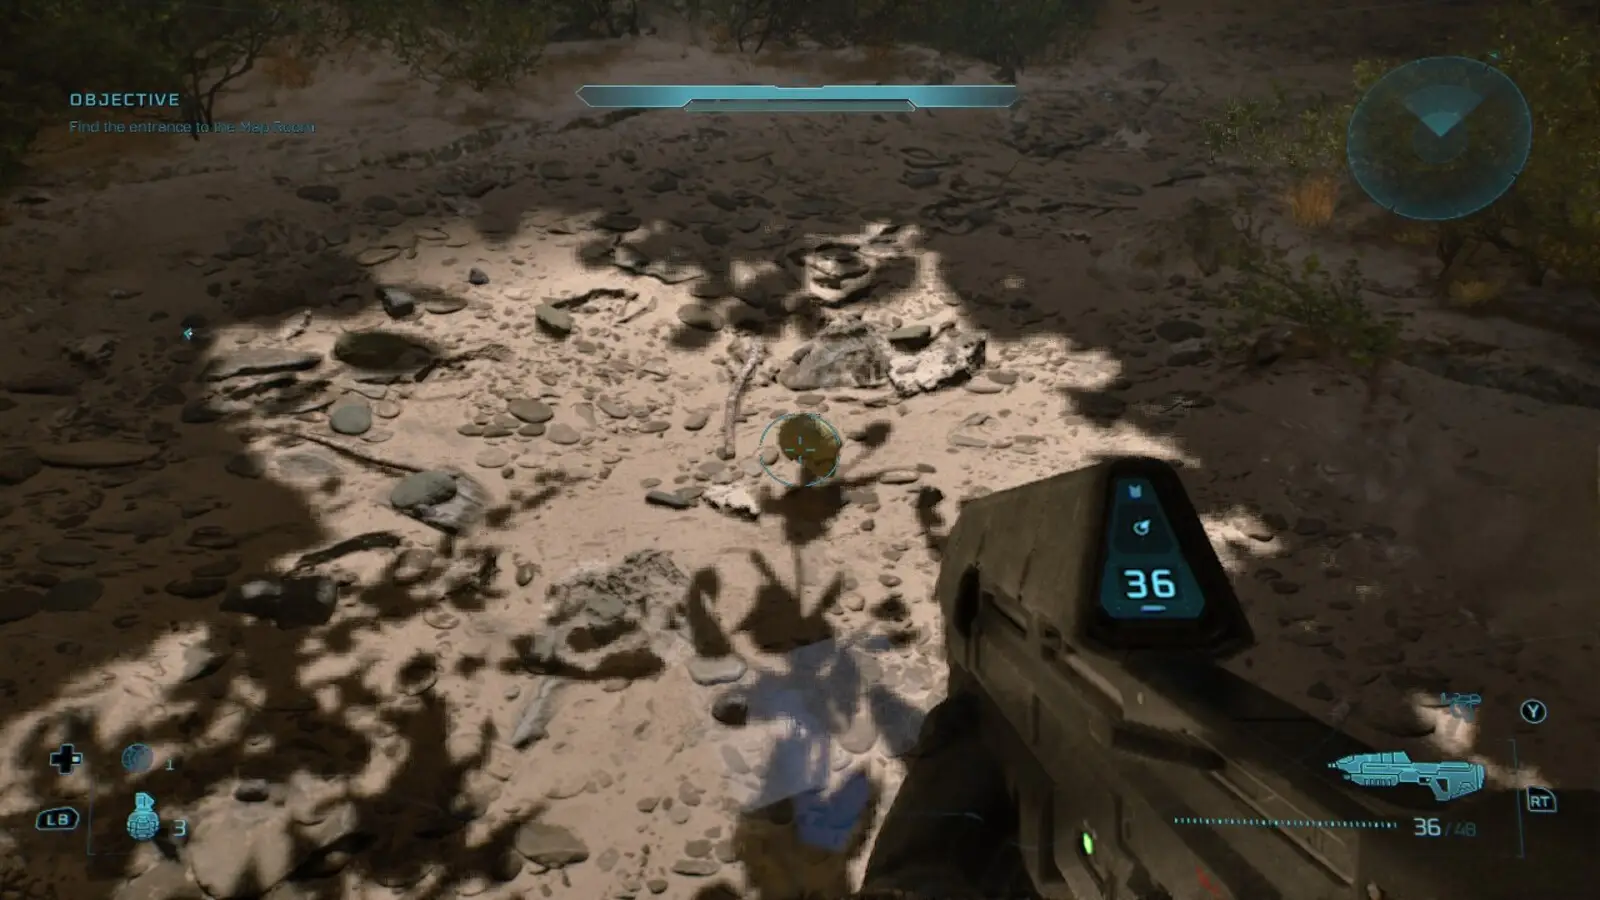
Drive the Warthog around the island until you reach the first interior facility. The mission route approaches the building from one side.
Instead of entering, continue past the entrance a bit and look for a small cave entrance just beyond it. Follow the path and you’ll find Bandana Skull on the ground in the center of the cave.
Bandana provides unlimited ammunition and grenades.
Acrophobia Skull Location
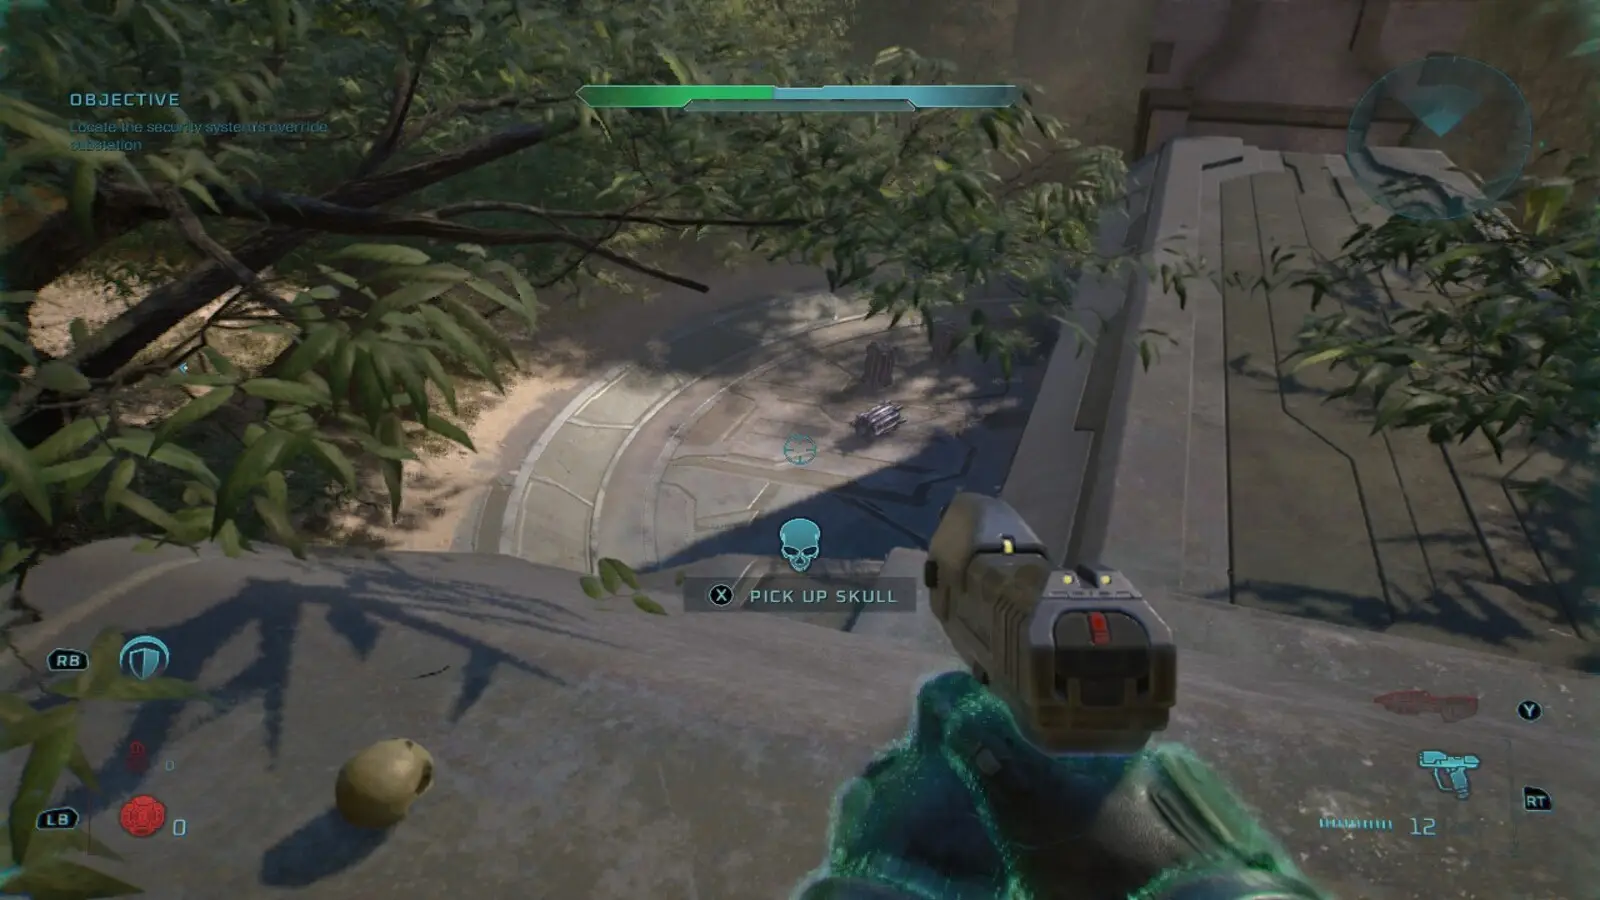
Continue until the above-ground encounter where two Hunters guard a small central structure.
Defeat the Hunters, then climb the sloped surfaces along the side of the structure. Keep jumping upward until you reach the roof. The Acrophobia Skull is sitting at the top.
Acrophobia allows you to fly by holding the jump button.
Hip Fire Skull Location
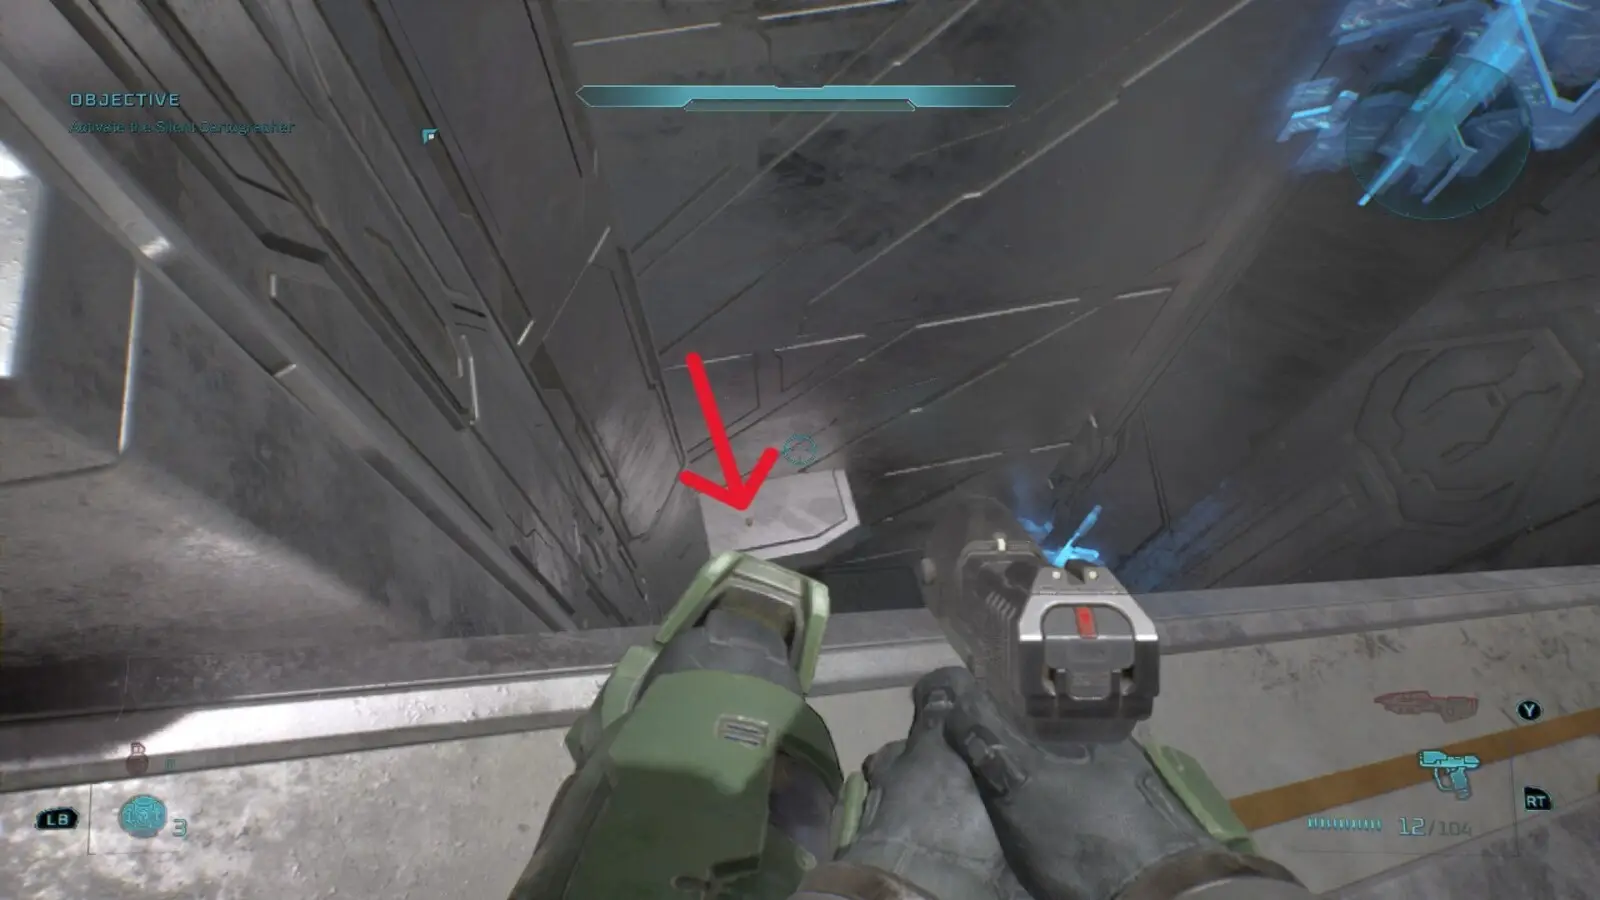
Near the end of the mission, enter the large underground facility used to locate Halo’s control room.
The Hip Fire Skull is in the large stairwell with a blue column in the center of it. The stairwell is after the room containing the two Hunters.
Walk to the inside edge and look down the shaft. The Skull sits on a narrow ledge about one and a half floors above the bottom.
Line yourself up directly above the platform, then carefully drop onto it. If you reach the two Hunters or the Silent Cartographer, turn around and return to the stairwell.
NOTE: You’ll also get to this stairwell after activating the Silent Cartographer and following the waypoints back to the surface. So don’t worry if you missed it on the way down.
Hip Fire disables aiming down sights and weapon zoom.
Assault on the Control Room Skull Locations
Assault on the Control Room contains the IWHBYD, Angry, and Cowbell Skulls. Vehicles make several of these locations easier to reach, so avoid abandoning your Scorpion or Banshee too early.
IWHBYD Skull Location
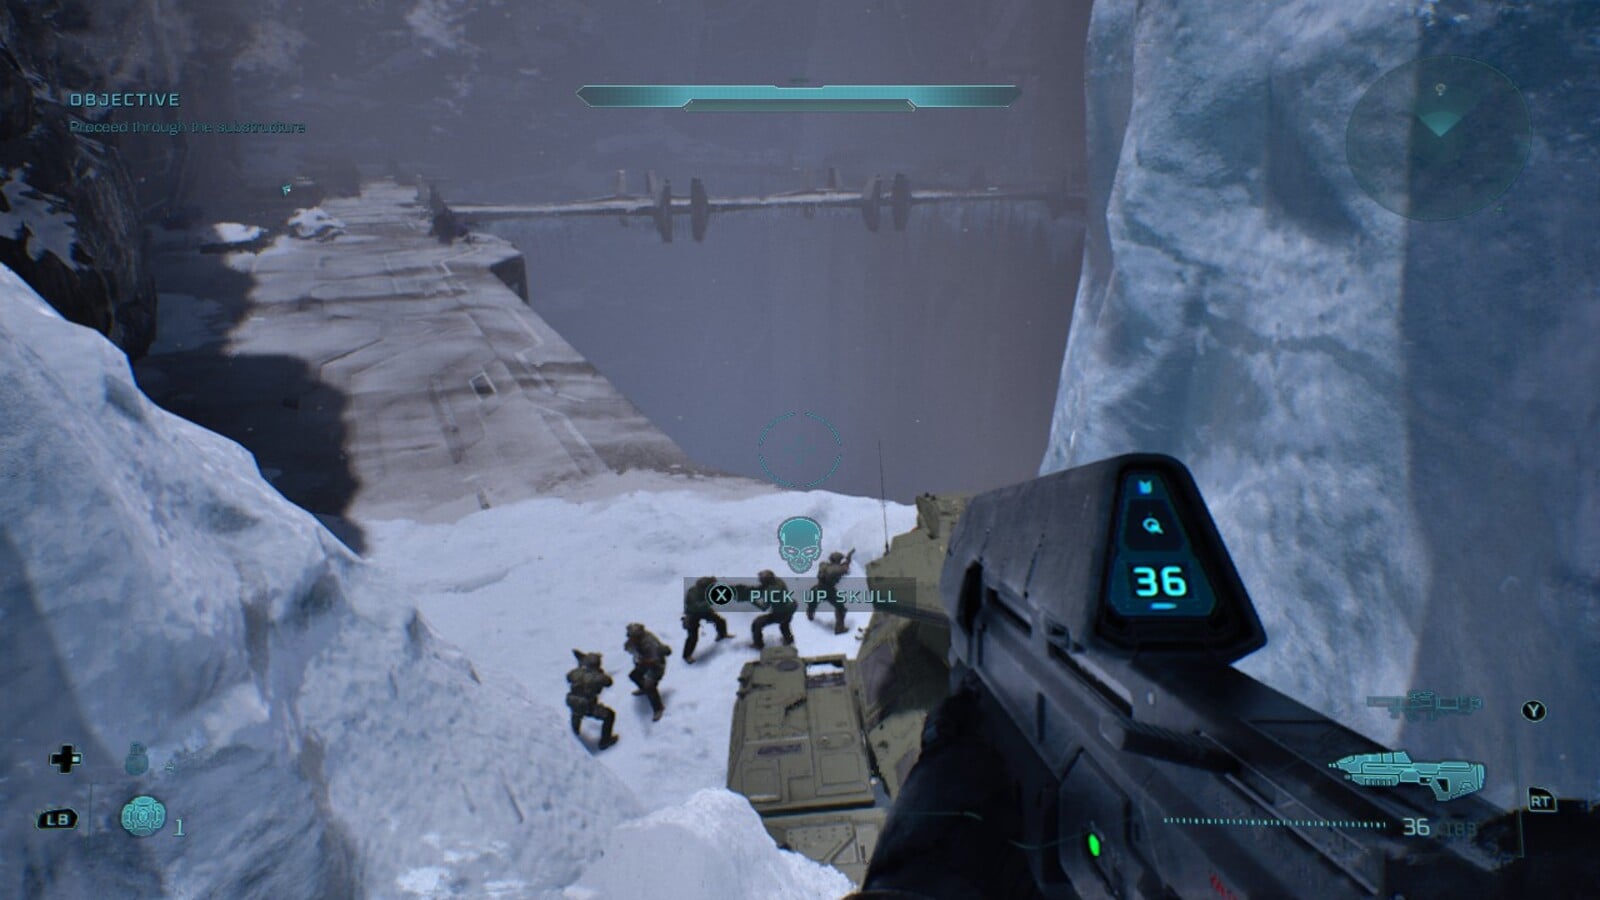
Continue until you receive the Scorpion tank. Unlock the door, and drive through the underground section and emerge into the snowy outdoor are with an icy bridge.
Cross the bridge and turn toward the snowbank on the left. A small opening is visible partway up the bank, but Master Chief cannot reach it with a normal jump.
Position the Scorpion near the slope and use the tank as a platform. Jump from the vehicle into the opening to collect the IWHBYD Skull.
IWHBYD makes rare combat dialogue play more often.
Angry Skull Location
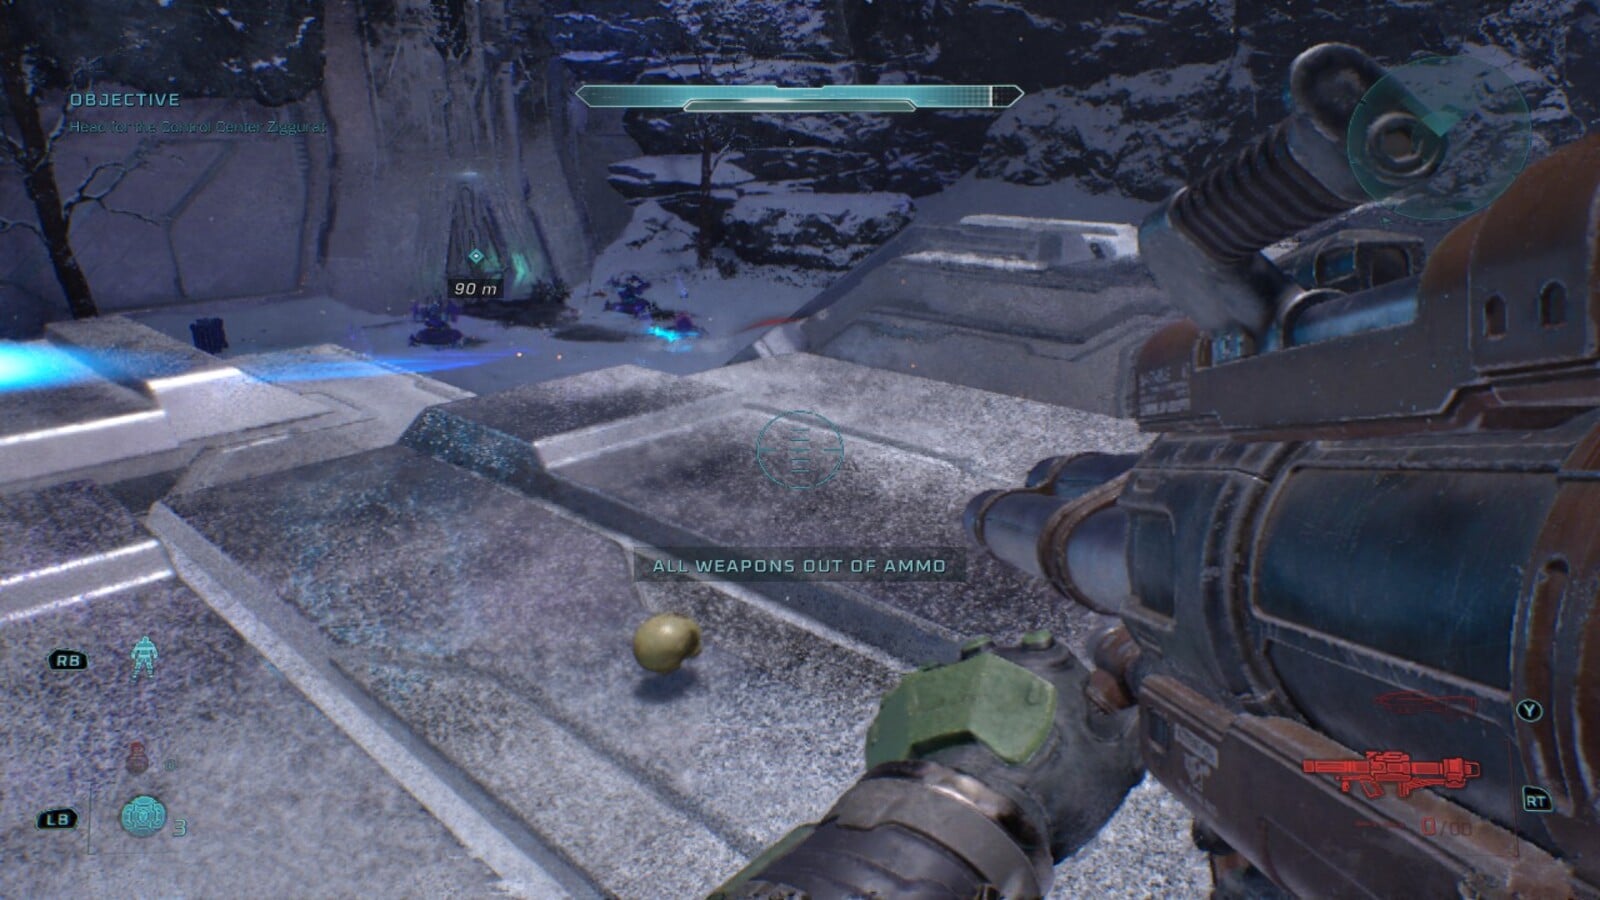
After finishing the main tank section, approach the facility entrance marked by three metal archways.
The Angry Skull is on top of the arch closest to the canyon wall. Use the nearby terrain or structure to climb onto the arch and walk across to the collectible.
Angry makes enemies fire faster and more frequently.
Cowbell Skull Location
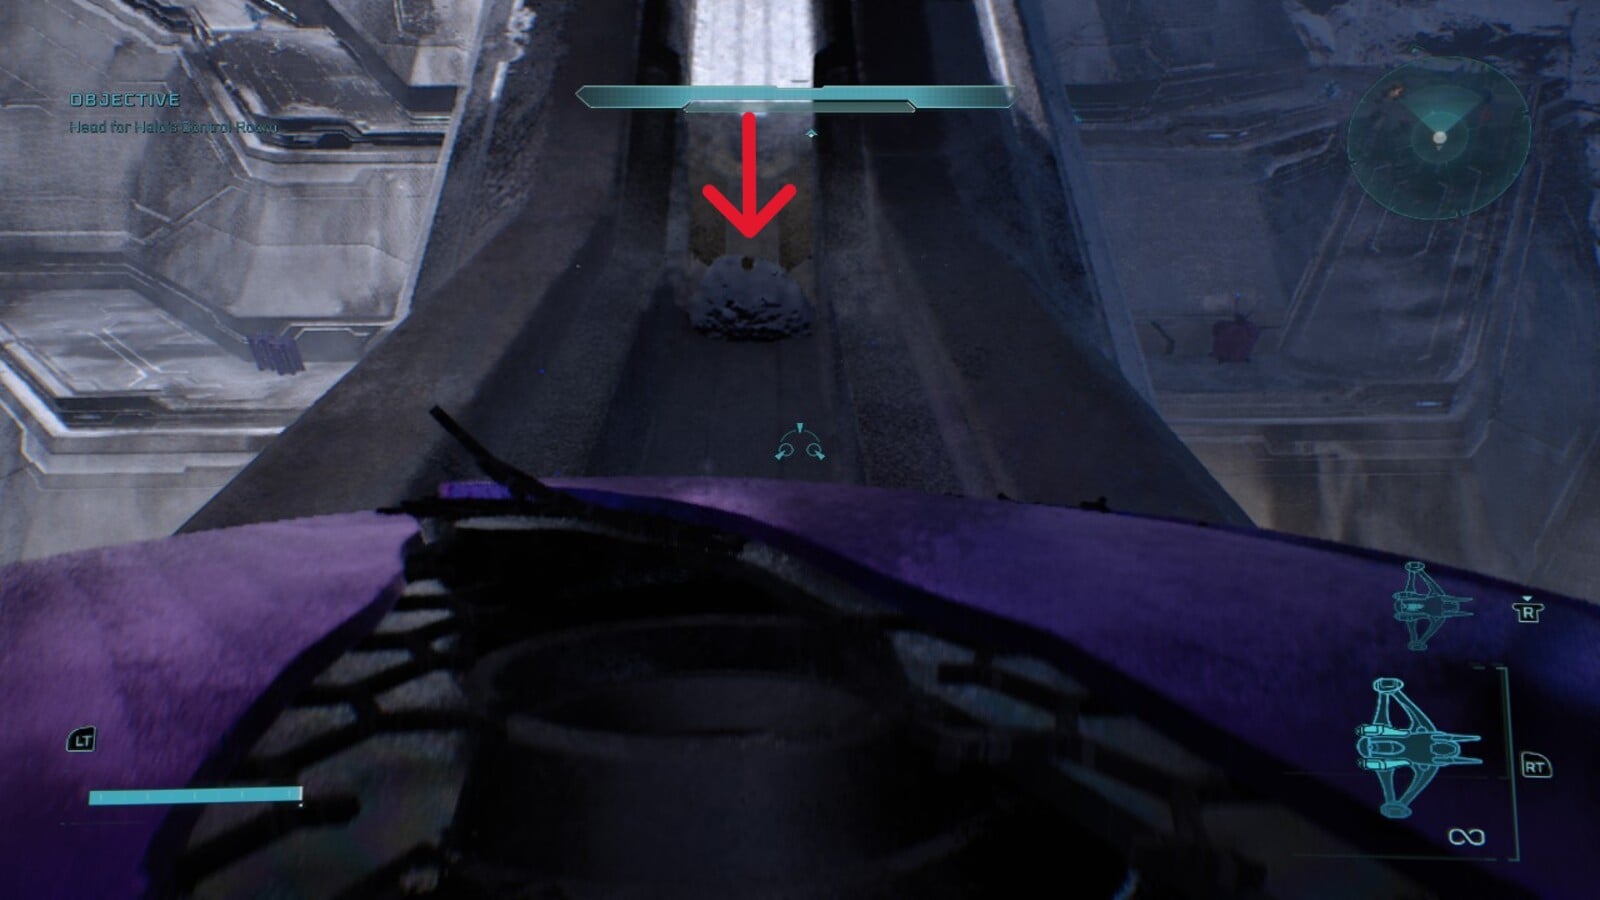
The Cowbell Skull is near the end of Assault on the Control Room, after reaching the If I Had a Super Weapon checkpoint.
Rush through the door and eliminate the Elites before they escape in the two Banshees. Steal one of the aircraft and fly toward the Control Center ziggurat. Taking the Banshee also unlocks the That’s My Ride achievement if you have not earned it already.
Fly beneath the large elevated bridge attached to the structure. Look for a loose rock resting on top of the metal platform below the bridge. The Cowbell Skull is sitting on that rock.
Do not search the surrounding snow for a natural rock formation. The rock containing the Skull is positioned directly on the Forerunner structure.
Land the Banshee on the nearby platform, then walk across to collect the Skull.
Cowbell reduces the physics mass of objects, allowing explosions and impacts to move them farther.
343 Guilty Spark Skull Locations
343 Guilty Spark contains the Fog, That’s Just… Wrong, and They Come Back Skulls. One appears before entering the facility, while the others are found after the mission’s encounters take a much darker turn.
Fog Skull Location

During the opening swamp section, follow the route until you cross a long fallen tree trunk.
However, don’t cross the tree yet. Instead, stand on the beginning part of it and look to your left. You’ll see a series of rock formations you can climb up. Jump up the rock formation to reach the upper ledge. The Fog Skull is sitting at the top.
Fog disables the motion tracker.
That’s Just… Wrong Skull Location

Enter the facility and continue past the early Covenant encounters. You will eventually meet a terrified Marine who shouts that you will not turn him into one of the creatures.
Kill that Marine. He drops the That’s Just… Wrong Skull after dying.
That’s Just… Wrong increases enemy awareness and makes it harder to approach opponents unnoticed.
They Come Back Skull Location

Near the end of the level, escort the surviving Marines toward the evacuation area. You will see Sentinels fighting Flood near a large metal structure.
Face that structure and move to the right instead of approaching it. You’ll want to hug the wall and continue forward until you find a thin fallen log bridging a gap. Walk across the log and climb onto the rock to the left at its end to find the They Come Back Skull.
They Come Back strengthens Flood Combat Forms revived by Infection Forms.
The Library Skull Locations
The Library contains the Tilt, Pop, and Famine Skulls. Each one is hidden near a major room or floor transition, making them easy to pass during the mission’s constant Flood attacks.
Tilt Skull Location

After taking the service tunnel, go up the ramp into the next room. The objective will update to Take the elevator into the lower chambers. Before heading toward the elevator, turn right and climb the slanted support beside the ramp you just used. Follow it to the top to find the Tilt Skull.
Tilt increases both positive and negative damage multipliers. Weapons become more effective against the targets they are designed to damage and less effective against unsuitable targets.
Pop Skull Location

Ride the first elevator down and follow either of the two parallel hallways. They eventually reconnect at a locked door that 343 Guilty Spark must open while you defend the area.
Stand with your back to that locked door. The Pop Skull is visible on top of the raised central structure with lights on it, across from the door.
Use the side ramp to gain height, then jump across the elevated platforms until you reach the Skull.
Pop makes Flood explode when their weak points are shot.
Famine Skull Location

Continue through The Library until the objective updates to Take the elevator to the final chamber. Ride that elevator and wait for the transition to finish.
After stepping off, move straight down the central ramp and enter the narrow service tunnel ahead. Turn left as soon as you enter to find the Famine Skull on the floor among the Flood growth.
Famine cuts the ammunition found in enemy-dropped weapons in half.
Two Betrayals Skull Locations
Two Betrayals contains the Tough Luck, Black Eye, and Mythic Skulls. Keep access to a Banshee whenever possible because two of the locations require exploring areas away from the normal objective route.
Tough Luck Skull Location

After the opening cutscene, leave the control room and obtain a Banshee as directed.
Instead of immediately flying toward the objective, take the Banshee to the very top of the control room structure. Aim for the platform beside the blue energy beam.
Land carefully and exit the vehicle. The Tough Luck Skull is on the platform next to the beam.
Tough Luck makes enemies dive more frequently, behave aggressively, and avoid retreating.
Black Eye Skull Location

Continue toward the second generator. After riding the elevators down, you will emerge into a canyon facing three metal arches. You’ll be on the
Jump on top of and cross the far-right archway. When across, search for a short dead end covered with Flood biomass. The Black Eye Skull is on the ground inside that alcove.
Black Eye prevents your shields from recharging normally. Melee attacks are required to restore them..
Mythic Skull Location

On the way to the second conduit, use a Banshee to reach the next landing area. You will see a central tower and another landing pad across the canyon from the mission objective.
Land at the central structure and activate the console there. This opens an optional door on the opposite side of the central structure.
Fly to that door and enter the optional combat route. You must completely clear three rooms. The first contains Elites and Fuel Rod Grunts, the second includes shielded Elite Flood, and the final room contains the large Hunter-like Flood forms.
Kill every enemy in all three rooms. The Mythic Skull appears in the center of the last room after the encounter is fully cleared.
Mythic increases enemy health.
Keyes Skull Locations
Keyes contains the Catch, Blind, and Pinata Skulls. Catch has the strictest requirement of the three, while the other two are found after returning to the Covenant ship. See our guide if your game crashes during this mission.
Catch Skull Location
The Catch Skull requires Heroic or Legendary difficulty and a fast run from the beginning of the mission to the gravity lift.
Drop from the Covenant ship and immediately move toward the lift. Avoid unnecessary fights and jump past enemies where possible.
An Active Camouflage pickup is near the location where you first land. Save it for one of the more crowded sections, such as the riverbed where the Covenant and Flood are fighting.
An Overshield can also be found along the right-hand route beneath the gravity lift. You only need to defeat the Covenant directly guarding the lift before it activates.
Reaching the lift in fewer than four minutes is fast enough, although the exact cutoff is not displayed. Hold the Interact button as the lift carries you upward because the Catch Skull appears shortly before you enter the ship.
Catch makes enemies throw and drop more grenades.
Blind Skull Location
After reentering the Covenant ship, continue until you reach the first vehicle bay.
At the far end is a corridor partly blocked by a Wraith and piles of weapon crates. Push through or climb around the boxes until you reach the door at the end. The Blind Skull is in the corner beside it.
Blind removes the HUD and prevents your equipped weapon from appearing on screen.
Pinata Skull Location

Reach Captain Keyes and retrieve the neural implants containing the ship’s command codes.
Do not immediately leave. Keep striking Keyes’ body with melee attacks until the Pinata Skull becomes available.
The Skull may remain inside or underneath the character model instead of visibly falling onto the floor. Crouch, change your angle, and watch for the interaction prompt.
Pinata makes enemies drop grenades when hit with melee attacks.
The Maw Skull Locations
The Maw contains the Stowed Reload, Boom, and Thunderstorm Skulls. The first two appear before the final escape, while Thunderstorm must be collected during the Warthog run.
Stowed Reload Skull Location
Reach the bridge, then begin the route toward engineering. You will pass back through the cryo room from the opening mission.
Look in the back-left corner, where fire has damaged part of the chamber. The Skull is on a small platform beside the flames.
Jump from the broken walkway to reach the Stowed Reload Skull.
Stowed Reload automatically reloads weapons while they are not equipped.
Boom Skull Location
Enter engineering, where you must destroy the four exposed vents.
Move to the right side of the chamber and climb to the second level. Find the small platform used to jump toward the upper corridor.
Do not jump up to the corridor. Drop onto the narrow ledge directly beneath the platform instead. The Boom Skull is hidden in the corner.
Boom doubles the radius of explosions.
Thunderstorm Skull Location
Begin the Warthog escape and continue until you enter the winding tunnel containing several small shortcut passages.
Drive into the second shortcut. The Thunderstorm Skull is in the middle of the tunnel, so slow down enough to interact with it.
Thunderstorm upgrades the rank of most enemies.
Boarding Action Skull Locations
Boarding Action contains the Malfunction, Johnny Ammo Seed, and Leadhead Skulls. Each one sits along an optional route branching away from the mission’s main path.
Malfunction Skull Location
Climb through the opening sections until you enter an area containing two white-and-gold Hunters.
Defeat both Hunters, but do not follow Johnson. Find the ramp across from the entrance and take that alternate path instead.
Continue through the newly accessible doors until you reach a narrow bridge. The Malfunction Skull is sitting on it.
Malfunction removes a random part of the HUD whenever you respawn.
Johnny Ammo Seed Skull Location
Continue until you reach the large sandy arena filled with Covenant. Clear the encounter and use the ramp to reach the second level.
From there, turn back toward the direction you originally entered. Follow the route into the previous room, now from its third-floor level.
Defeat the stronger Elites guarding the upper area. The Johnny Ammo Seed Skull is on the curved ledge near the tree.
Johnny Ammo Seed discards any ammunition remaining in your current magazine whenever you reload.
Leadhead Skull Location
Progress through the biological laboratories until you reach a small room with a vertical lift in its center.
Clear the enemy waves. When the mission tells you to use the lift, search for the open door to its left instead.
Follow that hallway to the end to collect the Leadhead Skull.
Leadhead removes extra headshot damage and prevents headshots from causing instant kills.
The Most Dangerous Game Skull Locations
The Most Dangerous Game contains the Temperamental, Recession, and Ghost Skulls. Temperamental requires actions across several encounters, so begin working toward it as soon as the gold Elite first appears.
Temperamental Skull Location
Temperamental does not initially appear as a normal collectible. You must shoot a fleeing gold Elite during three separate appearances.
You do not need to kill the Elite. Land enough ranged fire to break or visibly damage its shield before it escapes.
First Gold Elite
After meeting the Marines, enter the outdoor arena with Jackal snipers positioned in the trees. Look toward the cliff ledge on the upper-right side.
Shoot the gold Elite before it retreats.
Second Gold Elite
Continue into the next arena containing the long purple bridge and Wraith. A sniper rifle is available near the right side of the entrance.
The second gold Elite appears behind the Wraith near a distant door. Use the sniper rifle to hit it from the ledge.
Third Gold Elite
After freeing the prisoners, enter the next outdoor arena. The final gold Elite appears on the cliff to the left.
Hit it before it disappears, then clear the remaining enemies. If all three encounters were completed correctly, the Temperamental Skull appears on the large purple structure in the middle of this arena.
Temperamental causes friendly characters to turn against you more quickly after you kill an ally.
Recession Skull Location
After joining the Marines, continue to the arena with the long purple bridge and a Wraith parked at the far end.
Turn toward the opposite end of the bridge. Find the large door with two purple flames or braziers above it.
Explosive containers sit on both sides of the doorway. Destroy the containers to open the door, then collect the Recession Skull from the room inside.
Recession causes each shot to consume twice the normal amount of ammunition.
Ghost Skull Location
Later, cross the large purple bridge where Banshees attack and pass through a cave into the next outdoor arena.
Clear the Covenant, then turn around and face the doorway you used to enter. The Ghost Skull sits on top of a brazier above that entrance.
Look along the rocks beside the door for several uneven footholds. Use a grenade jump to reach the higher rocks, then carefully move along the wall toward the brazier.
Frag grenades can be found near a dead Marine close to the entrance.
Ghost prevents enemies from flinching after taking damage.
Heavy Burden Skull Locations
Heavy Burden contains the Eye Patch, Grunt Birthday Party, and Efficient Skulls. The final two require careful platforming, and Efficient must be grabbed quickly before the out-of-bounds timer expires.
Eye Patch Skull Location
Move through the Covenant ship toward Tolerance’s bridge. You will eventually reach a chamber containing a suspended bridge and a separate walkway running beside it.
Do not cross the main bridge. On the side where you entered the room, go through the unlocked side door.
Follow the passage until you reach a locked door. The Eye Patch Skull is on the floor beside it.
Eye Patch disables weapon auto-aim.
Grunt Birthday Party Skull Location
After Rally Point Bravo, continue while regrouping with the surviving Marines. You will enter a large multilevel chamber from its upper floor.
Look toward the center for a tall rock formation with yellow plants or foliage growing on it. The Grunt Birthday Party Skull is at the top.
Drop to the second level and find the purple brazier close to the formation. Jump onto the brazier, then sprint-jump toward the lower shelf of the rock. Climb the remaining ledges to reach the Skull.
Grunt Birthday Party causes Grunt headshots to produce confetti and a celebratory sound.
Efficient Skull Location
Near the end of the mission, ride the large gondola until it stops because the power must be restored.
Restart the system and continue on the gondola. In the second area after power returns, look for two side platforms that can be reached by jumping from the moving gondola.
Jump onto the platform on the left. The game may display an out-of-bounds warning, so immediately sprint toward the back-right corner. The Efficient Skull is on the ground there.
The collection remains registered even if the out-of-bounds timer kills you before you return.
Efficient makes enemies drop additional ammunition when they are killed while you have full health.
How to Use Skulls in Halo Campaign Evolved
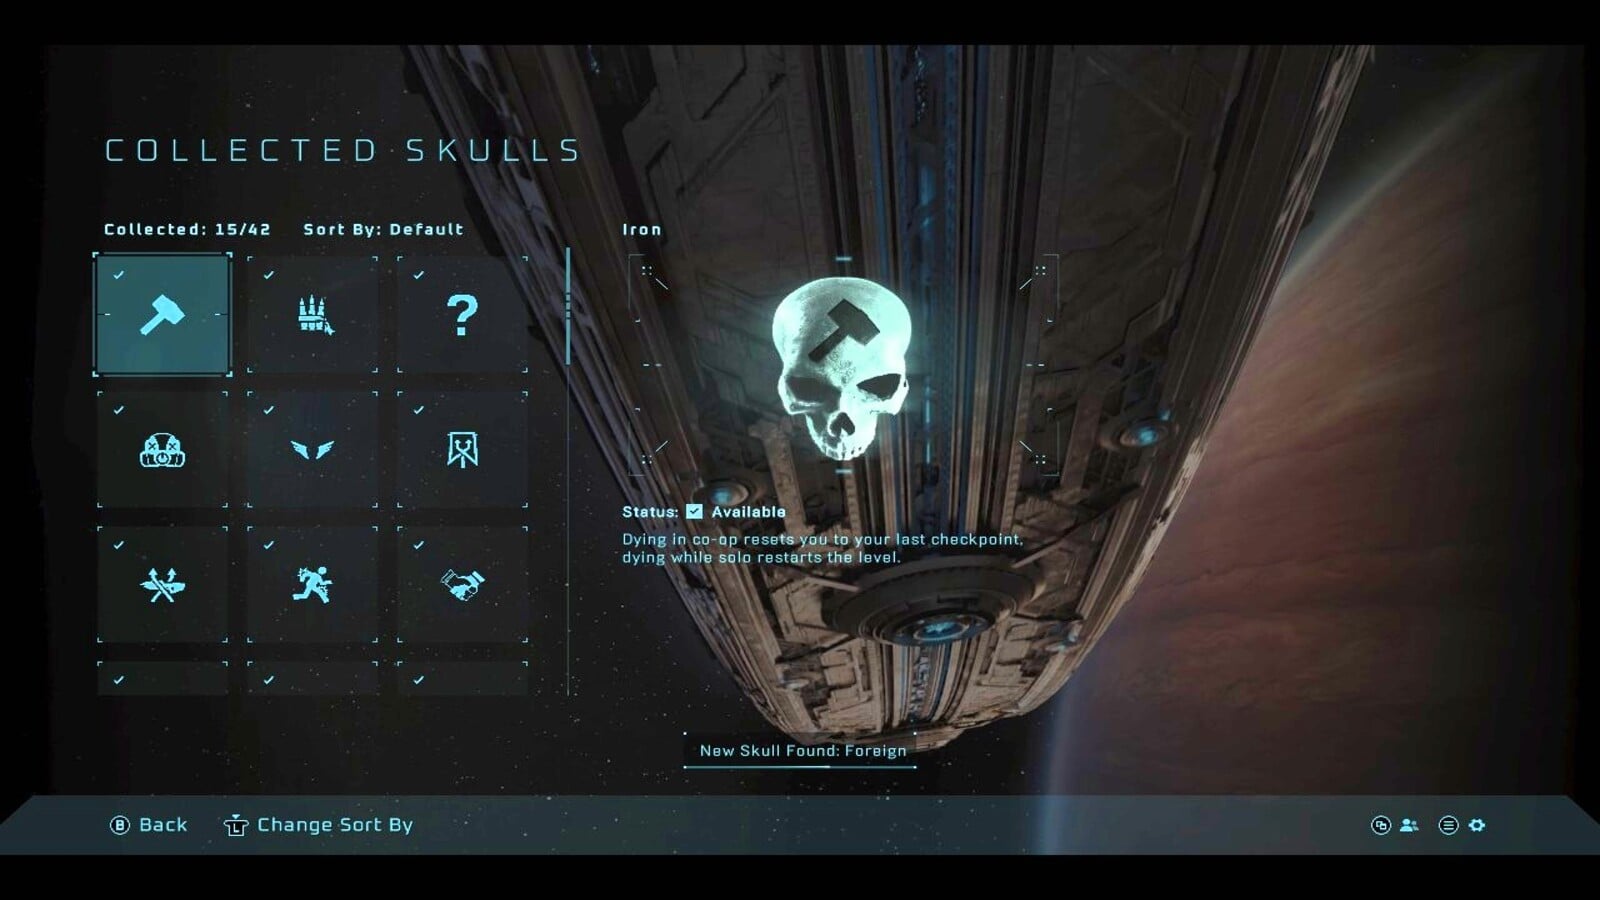
Collected Skulls can be viewed from the Collectibles menu. To activate one, select a campaign mission or begin a new game, then open the Skull options before starting.
The first three hidden Skulls you collect also unlock Campaign Remix. Adaptation, Armistice, and Reload are added automatically and used as part of that randomized mode.
Finding 17 specific challenge Skulls unlocks LASO. Collecting all 39 hidden Skulls unlocks Headhunter, while finding every Skull and Terminal unlocks Collector’s Addition. these routes are much easier after obtaining Acrophobia, but collecting them without active modifiers gives you the intended platforming challenge. Check the Terminal guide before starting each mission so you can clear every collectible in one run.
.nux-up-next-box { –nux-subtitle-blue: #2b93bb; –nux-heading-blue: #29577A; –nux-red-link: #b14866; –nux-pink-link: #e44d8b; –nux-white: #ffffff; –nux-light-blue-bg: #f2fbff; margin: 32px 0 10px; padding: 22px; border: 2px solid rgba(43, 147, 187, 0.25); border-radius: 16px; background: var(–nux-white); box-shadow: 0 10px 26px rgba(41, 87, 122, 0.12); color: var(–nux-heading-blue); } .nux-up-next-label { display: inline-block; margin-bottom: 10px; padding: 5px 10px; border-radius: 999px; background: var(–nux-light-blue-bg); color: var(–nux-heading-blue); font-size: 13px; font-weight: 800; letter-spacing: 0.08em; text-transform: uppercase; } .nux-up-next-title { font-size: 22px; font-weight: 800; line-height: 1.25; margin: 0 0 10px; color: var(–nux-heading-blue); } .nux-up-next-title a { color: var(–nux-heading-blue); text-decoration: none; } .nux-up-next-title a:hover { color: var(–nux-pink-link); } .nux-up-next-text { font-size: 15px; line-height: 1.6; color: #345f7c; margin: 0 0 18px; } .nux-up-next-buttons { display: flex; flex-wrap: wrap; gap: 12px; } .nux-up-next-button { display: inline-flex; align-items: center; gap: 8px; padding: 11px 16px; border-radius: 999px; background: var(–nux-pink-link); color: #ffffff !important; font-size: 15px; font-weight: 800; text-decoration: none !important; transition: transform 0.2s ease, background 0.2s ease; } .nux-up-next-button:hover { background: var(–nux-red-link); transform: translateY(-2px); } .nux-up-next-button.secondary { background: var(–nux-light-blue-bg); color: var(–nux-heading-blue) !important; border: 1px solid rgba(43, 147, 187, 0.35); } .nux-up-next-button.secondary:hover { background: #e5f6fc; color: var(–nux-pink-link) !important; } .nux-up-next-arrow { font-size: 18px; line-height: 1; } @media (max-width: 600px) { .nux-up-next-box { padding: 18px; } .nux-up-next-title { font-size: 20px; } .nux-up-next-button { width: 100%; justify-content: center; } }